

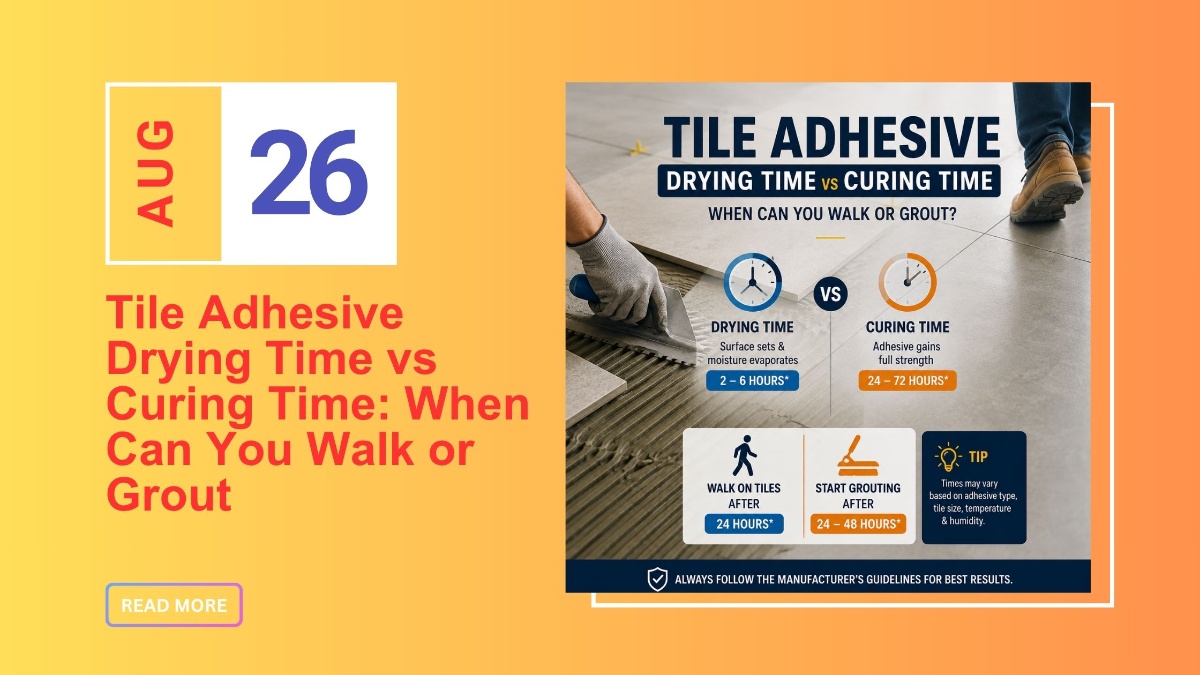
Installing tiles is only half the job. What happens after the tiles are laid is equally important. Many tile failures occur not because of poor adhesive quality but because the installation is disturbed before the adhesive has fully developed its strength. Walking on newly installed tiles too soon or grouting before the adhesive is ready can weaken the bond, create hollow spots, or even cause tiles to loosen over time. Understanding tile adhesive drying time is therefore essential for achieving a durable and professional installation.
Whether you're renovating a bathroom, installing porcelain tiles in a commercial building, or completing a large residential flooring project, patience during the drying and curing stages protects your investment. Every adhesive requires time to release moisture, gain strength, and securely bond the tile to the substrate. Rushing this process often leads to expensive repairs that could have been avoided by waiting just a little longer.
In this guide, you'll learn the difference between drying and curing, the factors that influence adhesive performance, and practical recommendations on when you can safely walk on or grout newly installed tiles.
Tile adhesive drying time refers to the period during which the water or moisture inside the adhesive gradually evaporates after installation. During this stage, the adhesive begins to harden and develop an initial bond between the tile and the substrate.
Many people assume that once the adhesive feels dry to the touch, the installation is complete. In reality, drying is only one stage of the bonding process. Although the surface may appear firm, the adhesive beneath the tile may still contain moisture and may not yet have developed sufficient strength to support foot traffic or grouting.
Drying time varies depending on the adhesive formulation, tile size, environmental conditions, and substrate characteristics. Fast-setting products generally dry more quickly than standard cement-based adhesives, but even rapid-setting systems require careful adherence to the manufacturer's recommendations.
While drying and curing are often used interchangeably, they describe two different processes.
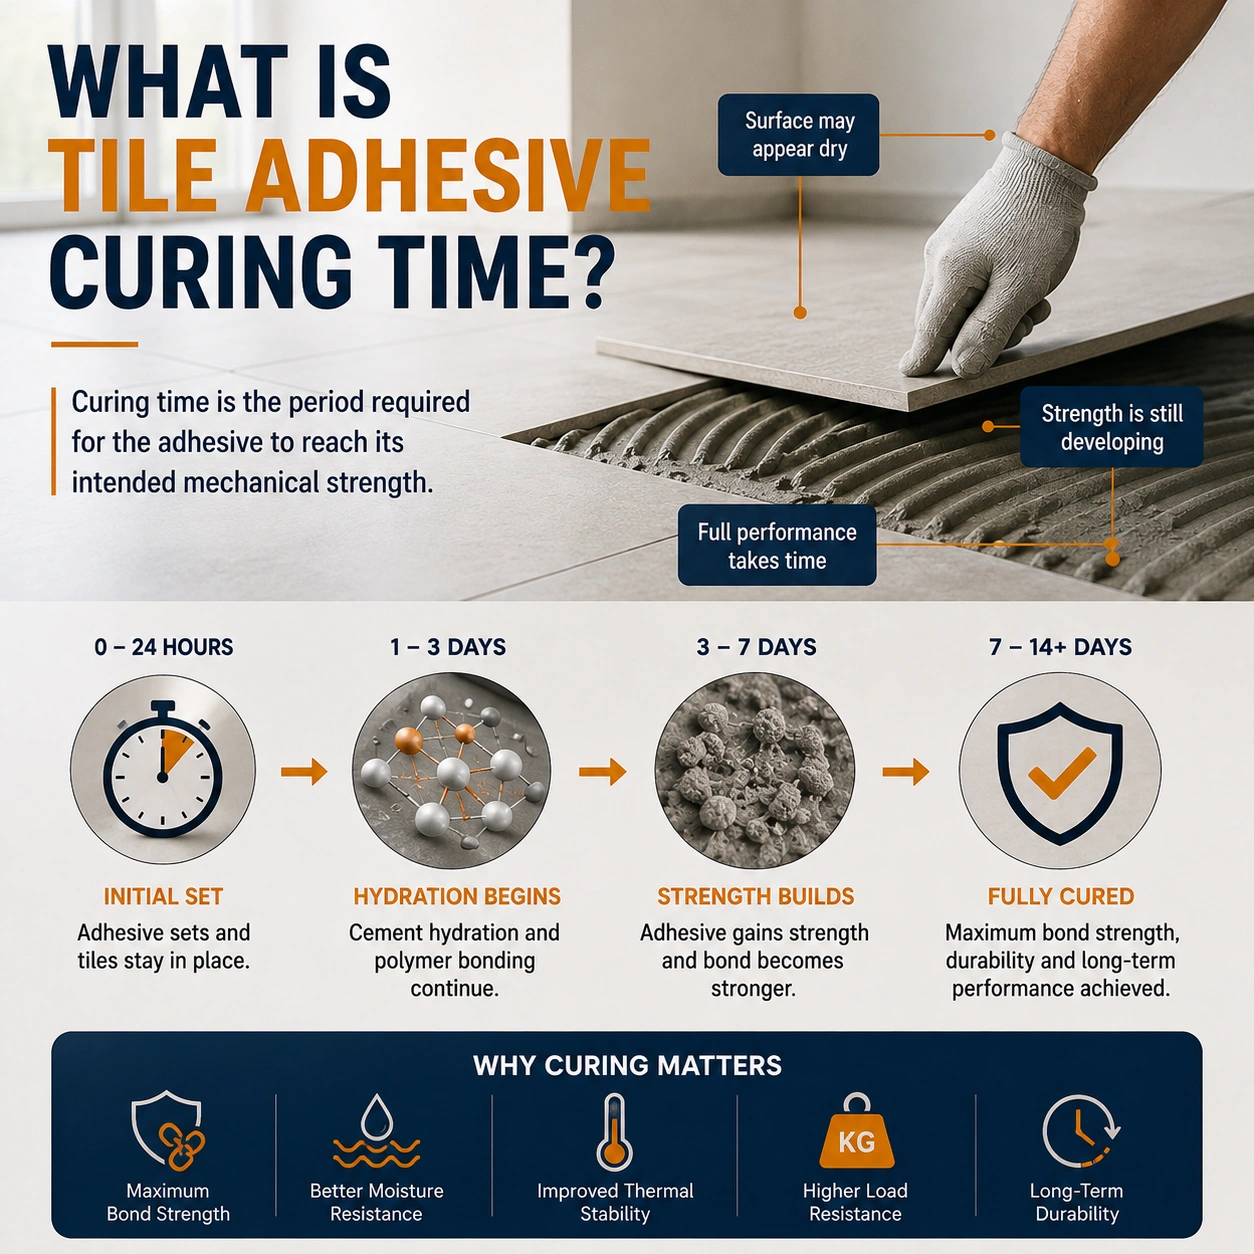
Tile adhesive curing time refers to the period required for the adhesive to reach its intended mechanical strength. During curing, the cement hydration process and polymer bonding continue even after the surface appears dry.
A fully cured adhesive provides maximum bond strength, improved durability, and long-term resistance to moisture, thermal movement, and loading. Until curing is complete, the adhesive remains more vulnerable to movement and disturbance.
For most cement-based tile adhesives, curing takes considerably longer than initial drying. This is why professional installers often recommend delaying heavy furniture placement or full service until the adhesive has completely cured.
Understanding this distinction helps prevent one of the most common installation mistakes—assuming that a dry adhesive is automatically ready for full use.
Although these terms are frequently confused, they represent different stages in adhesive performance.
|
Stage |
Drying Time |
Curing Time |
|
Purpose |
Moisture evaporates and adhesive hardens |
Adhesive reaches full bond strength |
|
Initial Tile Stability |
Yes |
Maximum stability |
|
Suitable for Light Activity |
Sometimes |
Yes |
|
Full Mechanical Strength |
No |
Yes |
Drying makes the installation appear stable, while curing ensures it performs reliably for many years.
For this reason, experienced tile installers always distinguish between adhesive setting time, drying, and complete curing before allowing heavy use.
Every tile installation follows a sequence of stages. First, the adhesive is mixed and applied. It then begins its adhesive setting time, during which the material starts hardening and securing the tile in position. After setting, drying continues as moisture gradually leaves the adhesive, while curing develops the final bond strength.
Interrupting any of these stages can compromise installation quality. For example, walking on tiles before sufficient strength has developed may compress adhesive ridges, reduce contact beneath the tile, or create uneven surfaces.
Similarly, grouting too early can introduce additional moisture and pressure before the adhesive has stabilized, increasing the likelihood of tile movement.
Understanding these stages helps installers determine when it is safe to continue each phase of the project.
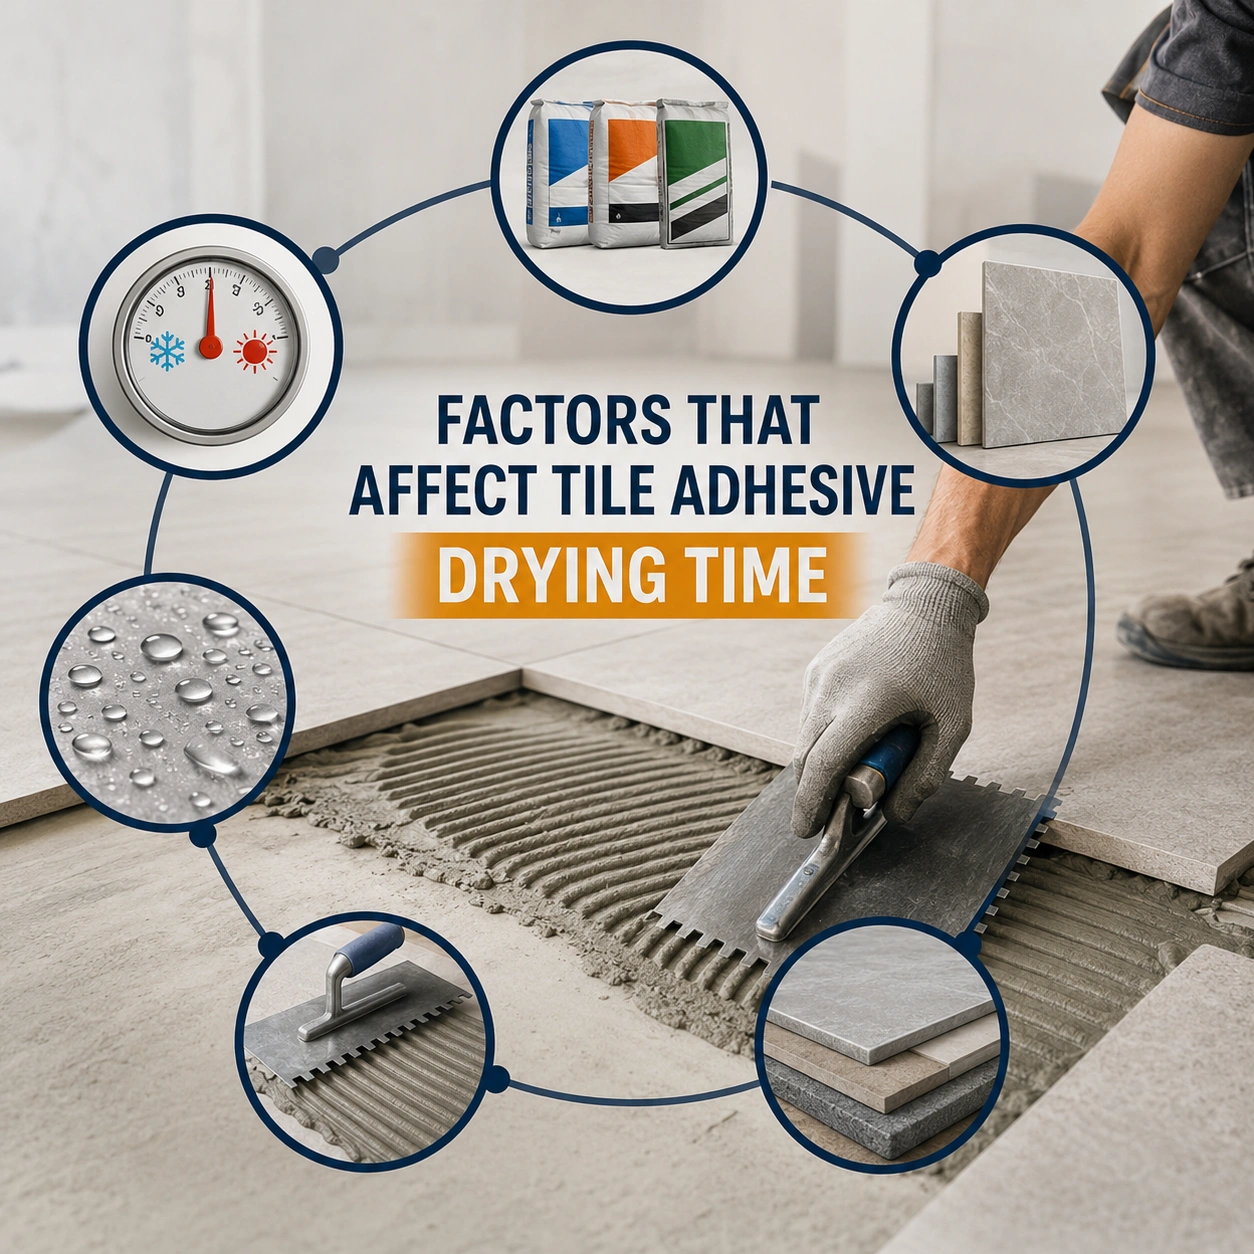
No two installations dry at exactly the same speed. Several environmental and project-specific conditions influence how quickly an adhesive reaches both its drying and curing stages.
Different adhesive formulations behave differently. Standard cement-based adhesives generally require longer drying periods than rapid-setting products.
Polymer-modified adhesives may also require additional curing time because the polymer components continue developing strength after the initial drying phase.
Choosing the appropriate adhesive should always consider both installation requirements and project timelines.
Larger porcelain tiles and natural stone slabs cover more adhesive surface, reducing airflow beneath the tile. As a result, moisture escapes more slowly, extending both tile adhesive drying time and curing time.
This is one reason why large-format tile installations often require longer waiting periods before grouting or allowing traffic.
Highly absorbent cement screeds and concrete substrates draw moisture away from the adhesive more quickly, which may shorten drying time under certain conditions.
Conversely, low-absorption substrates such as existing ceramic tiles, waterproof membranes, or uncoupling systems slow moisture movement and often increase curing time.
Professional installers consider substrate characteristics before determining installation schedules.
Ambient temperature has a significant effect on adhesive performance.
Warm conditions generally accelerate drying by increasing moisture evaporation, while cold environments slow hydration and curing. Extremely low temperatures may even prevent proper adhesive development if installation occurs outside the manufacturer's recommended temperature range.
Maintaining moderate working temperatures helps ensure consistent performance.
High humidity slows evaporation because the surrounding air already contains significant moisture. Bathrooms, basements, and enclosed construction sites often require longer drying periods than well-ventilated areas.
Improving ventilation without exposing fresh installations to excessive drafts helps create favourable curing conditions.
Applying excessive adhesive thickness increases the amount of moisture that must evaporate before drying and curing are complete.
Professional installers use the correct trowel notch size to achieve adequate coverage while avoiding unnecessarily thick adhesive beds.
Following manufacturer recommendations improves both bond strength and drying consistency.
Modern tile adhesives are engineered to deliver exceptional bond strength, but they require adequate time to perform as intended. Attempting to accelerate the process by exposing tiles to traffic or beginning the next installation stage prematurely often results in problems that become visible only months later.
Allowing sufficient tile adhesive drying time helps reduce the risk of debonding, hollow tiles, cracked grout joints, and costly repairs. Whether you're completing a small bathroom renovation or a large commercial flooring project, respecting the manufacturer's recommended waiting periods remains one of the simplest ways to improve installation quality.
For projects requiring complete installation systems, including grout and finishing products, you can also explore Lapifix Tile Grouts
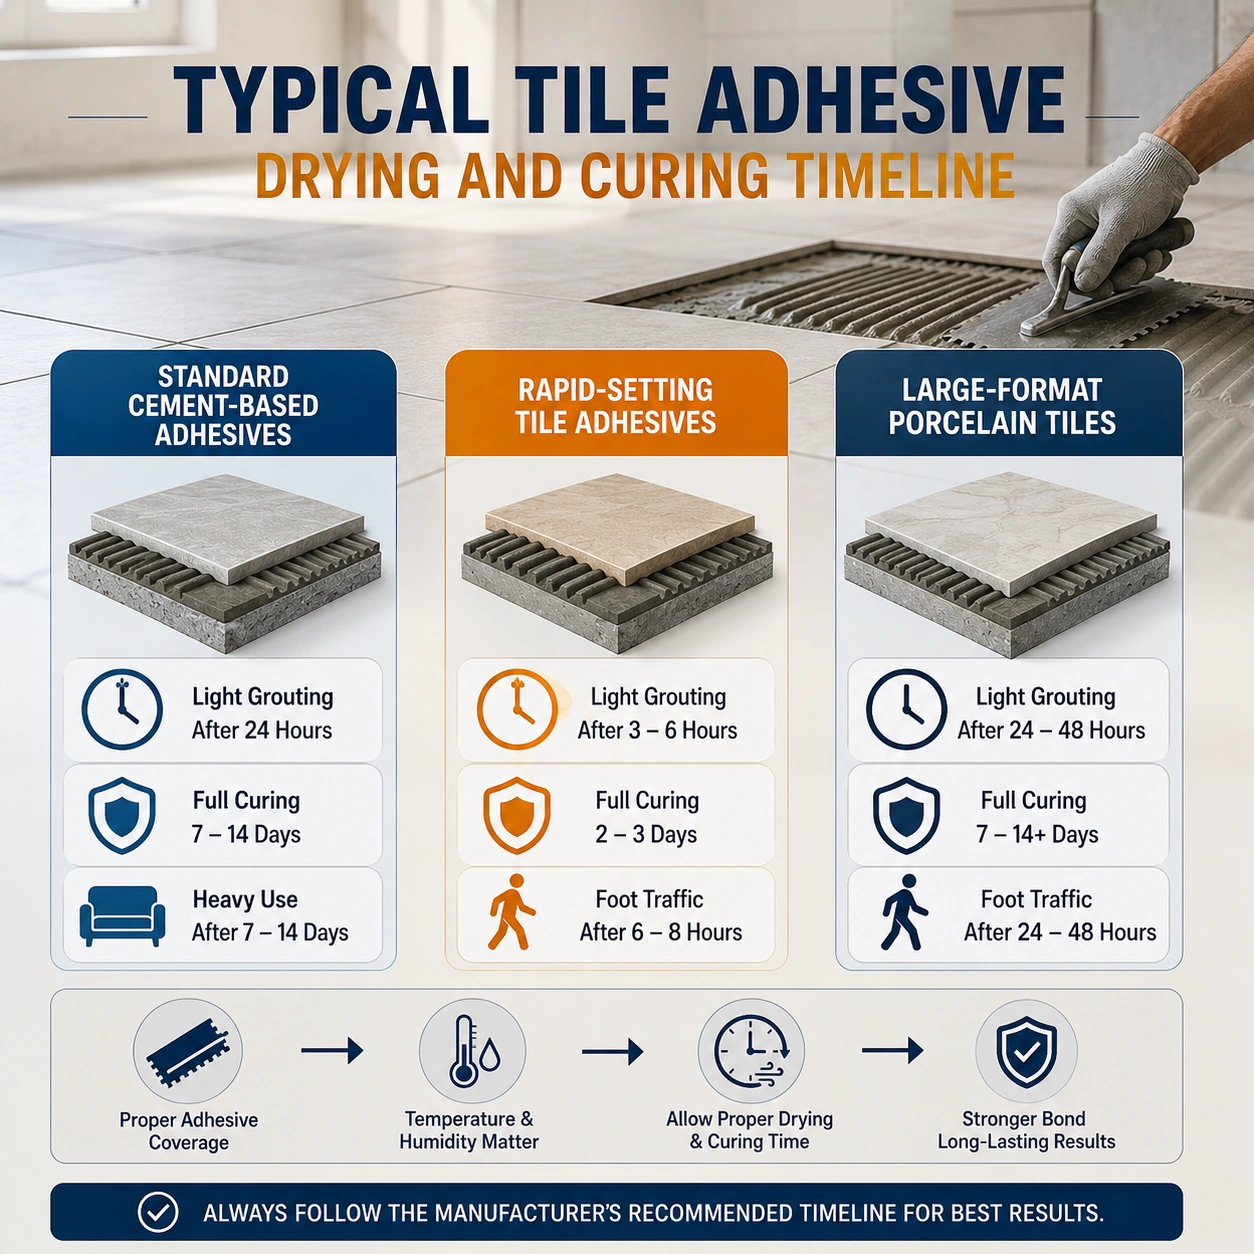
One of the most common questions after tile installation is, "How long should I wait before using the floor?" The answer depends on several factors, including the type of adhesive, tile size, environmental conditions, and the manufacturer's recommendations. While every product is different, understanding general timelines helps prevent premature loading and ensures a stronger installation.
Most cement-based adhesives develop sufficient initial strength within the first day, but achieving full performance takes considerably longer. This is why professional installers distinguish between adhesive setting time, tile adhesive drying time, and complete tile adhesive curing time rather than treating them as the same process.
Waiting an extra day may seem inconvenient, but it is far less costly than repairing loose or cracked tiles later.
Standard cementitious adhesives are widely used for ceramic, porcelain, and vitrified tile installations. Under normal conditions, these products generally allow light grouting after approximately 24 hours, provided the adhesive has dried sufficiently and the manufacturer confirms this timeline.
Complete curing, however, typically continues for several more days as hydration reactions strengthen the adhesive beneath the tile. During this period, heavy furniture, construction equipment, or concentrated loads should still be avoided.
Fast-setting products are designed for projects where reduced downtime is essential. Retail stores, hospitals, airports, hotels, and renovation projects often use these adhesives to return areas to service more quickly.
Although rapid-setting adhesives shorten adhesive setting time significantly, they still require careful installation and should only be loaded according to the manufacturer's recommendations.
Faster setting does not eliminate the need for proper curing—it simply accelerates the initial stages of strength development.
Large porcelain tiles and slabs create additional drying challenges because they cover more adhesive surface area and reduce airflow beneath the tile.
Moisture trapped beneath oversized tiles evaporates more slowly, often extending both tile adhesive drying time and curing time. Installers frequently allow additional waiting time before grouting or permitting foot traffic on these installations.
Using the correct trowel size and achieving full adhesive coverage become even more important for large-format projects.
Walking on newly installed tiles too early is one of the leading causes of installation failure. Even if the adhesive appears firm, pressure from foot traffic may compress adhesive ridges, disturb tile alignment, or reduce bond strength before curing has progressed sufficiently.
For most standard floor tile installations, light foot traffic is generally permitted only after the manufacturer's recommended waiting period has elapsed. Heavy traffic, moving furniture, rolling equipment, or construction activity should be delayed until the adhesive has developed adequate strength.
Wall tiles present different considerations because they are not subjected to walking loads. However, excessive vibration or impact should still be avoided while curing continues.
Professional installers often protect newly tiled floors with barriers or warning signs to prevent accidental access during this critical period.
Another frequently asked question is when to grout tiles after installation.
Grouting too early can interfere with adhesive performance by introducing additional moisture before the adhesive has stabilized. Pressure from grout application may also disturb tiles that have not yet developed sufficient bond strength.
Most manufacturers recommend waiting until the adhesive has completed its initial drying stage before beginning grouting. Under standard conditions, this is commonly around 24 hours, although cooler temperatures, high humidity, low-absorption substrates, and large-format tiles may require longer waiting periods.
Instead of following a universal schedule, always refer to the adhesive manufacturer's technical instructions.
Proper timing improves grout performance while reducing the risk of cracked joints or tile movement.
The table below provides general guidance for a typical cement-based tile installation under normal site conditions.
|
Installation Stage |
Typical Time* |
Purpose |
|
Adhesive Open Time |
20–40 minutes |
Period available for tile placement |
|
Adhesive Setting Time |
Several hours |
Initial hardening begins |
|
Tile Adhesive Drying Time |
Approximately 24 hours |
Suitable for grouting under normal conditions |
|
Tile Adhesive Curing Time |
Several days |
Full bond strength develops |
|
Heavy Furniture & Equipment |
After full curing |
Prevents bond failure |
Actual times vary depending on product type, environmental conditions, tile size, and manufacturer recommendations.
This comparison illustrates why drying and curing should never be treated as identical stages.
Many installers choose between rapid-setting and conventional adhesives based on project schedules rather than simply adhesive strength.
Standard adhesives provide generous working time, making them well suited for large installations where careful tile positioning is important. Longer open time allows installers to adjust tiles without rushing.
Rapid-setting products, by contrast, reduce project downtime by reaching initial strength much more quickly. This makes them valuable for commercial renovations where businesses need to reopen as soon as possible.
However, fast-setting adhesives demand careful planning because their shorter working time leaves less opportunity for repositioning tiles after installation.
Selecting the appropriate product depends on installation conditions, project deadlines, tile type, and environmental factors.
Many installation problems arise because drying conditions are less than ideal rather than because of adhesive quality. Avoiding a few common mistakes helps ensure consistent curing and stronger tile bonding.
Applying adhesive too thickly.
Installing tiles on damp or contaminated substrates.
Working in very cold or excessively humid environments.
Walking on tiles before the recommended waiting period.
Beginning grout application too early.
Using the wrong adhesive for large-format porcelain tiles.
Professional installers minimize these risks by following manufacturer recommendations and maintaining suitable environmental conditions throughout the curing process.
Proper installation techniques contribute just as much to adhesive performance as product selection.
Always mix adhesive according to the manufacturer's recommended water ratio. Excess water weakens the adhesive matrix and may increase tile adhesive drying time.
Use the correct trowel notch size to achieve full coverage without applying excessive adhesive thickness. Large-format porcelain tiles often require back-buttering to eliminate voids beneath the tile.
Avoid installing tiles in direct sunlight or strong winds that may cause uneven drying. Similarly, protect newly tiled areas from rain, freezing temperatures, or heavy construction traffic until curing is complete.
For projects requiring structural fixing and complete tile installation systems, you can also explore Lapifix Structural Fixing Solutions
Even when you follow the manufacturer's instructions, surrounding conditions can significantly influence tile adhesive drying time and overall curing performance. Temperature, humidity, airflow, and substrate moisture all affect how quickly an adhesive develops strength.
Warm temperatures generally accelerate moisture evaporation, helping the adhesive dry more quickly. However, excessive heat can reduce the adhesive's open time, making installation more challenging. Installers working in hot climates often prepare smaller sections at a time to avoid premature skinning of the adhesive.
Cold weather has the opposite effect. Lower temperatures slow cement hydration, extending both tile adhesive drying time and tile adhesive curing time. If temperatures fall below the manufacturer's recommended range, the adhesive may not achieve its intended bond strength.
Humidity also plays a critical role. Bathrooms, basements, and enclosed spaces with limited ventilation retain moisture longer, slowing evaporation and extending curing times. Maintaining moderate ventilation without creating strong drafts helps provide ideal curing conditions.
Finally, substrate moisture should never be overlooked. Damp concrete or newly poured screeds release moisture into the adhesive system, increasing the time required before grouting or allowing traffic.
Many installers ask whether there is a simple way to determine if curing is complete. Although visual inspection alone cannot confirm full strength, several practical indicators help assess adhesive readiness.
Tiles should feel completely stable with no movement, rocking, or hollow sounds when lightly tapped. Grout joints should remain intact without cracking due to tile movement, and there should be no visible moisture beneath translucent or light-coloured tiles.
Professional contractors rely primarily on the manufacturer's curing recommendations because curing occurs beneath the tile where direct inspection is impossible. Waiting the recommended period provides the safest approach, especially before installing heavy furniture or opening commercial spaces to full traffic.
For high-value installations involving large-format porcelain slabs, natural stone, or industrial flooring, allowing additional curing time often provides greater long-term reliability.
While curing should never be artificially rushed, several good installation practices help ensure consistent adhesive performance.
The substrate should be clean, level, dry, and structurally sound before adhesive application begins. Contaminants such as dust, grease, curing compounds, or loose particles reduce bond quality regardless of drying time.
Mix adhesive exactly according to the manufacturer's recommended water ratio. Adding excessive water may improve workability temporarily, but it often weakens the adhesive and increases drying time.
Maintaining the recommended adhesive thickness using the correct trowel notch size also improves drying consistency. Excessively thick adhesive beds retain moisture longer and delay curing.
Protect newly tiled surfaces from rain, freezing temperatures, heavy loads, and unnecessary foot traffic until the adhesive has reached the required strength.
These simple practices significantly improve installation quality while reducing the likelihood of future tile failures.
The tile industry continues to evolve as larger tiles, faster construction schedules, and improved adhesive technologies reshape installation practices.
Rapid-setting polymer-modified adhesives are becoming increasingly common because they reduce downtime without compromising long-term performance. These products are particularly valuable in retail stores, airports, hospitals, and commercial renovations where quick reopening is essential.
Manufacturers are also introducing lower-emission adhesive formulations that support sustainable construction while maintaining excellent bond strength.
Another growing trend is the use of digital moisture meters and job-site monitoring tools to verify substrate conditions before installation begins. These technologies help contractors make better decisions regarding drying conditions and project scheduling.
Training has also become more important. Professional installers increasingly rely on manufacturer certification programs to stay updated on modern adhesive technologies, large-format tile installation techniques, and evolving international standards.
Professional tile installations should always follow recognized industry standards in addition to product-specific instructions.
The Tile Council of North America (TCNA) publishes internationally respected installation guidelines covering substrate preparation, movement joints, adhesive selection, curing practices, and maintenance recommendations.
These guidelines emphasize that drying and curing times should never be estimated solely by appearance. Environmental conditions, tile size, substrate type, and adhesive formulation must all be considered before permitting traffic or beginning grout installation.
Similarly, adhesive manufacturers provide technical data sheets containing product-specific recommendations that should always take precedence over generalized timelines.
Construction schedules often create pressure to complete projects quickly. However, attempting to reduce waiting time rarely saves money in the long run.
Premature foot traffic may shift tiles before the adhesive has stabilized. Grouting too early can create stress within the installation, increasing the likelihood of cracked joints or debonded tiles. Heavy furniture placed on partially cured adhesive may permanently affect bond quality beneath the tile.
Allowing adequate tile adhesive curing time reduces the risk of costly repairs, warranty claims, and project delays caused by installation failures.
Whether you're completing a residential bathroom or a large commercial flooring project, patience remains one of the most cost-effective investments in long-term tile performance.
Understanding the difference between tile adhesive drying time and tile adhesive curing time is essential for achieving durable, long-lasting tile installations. While drying prepares the adhesive for the next stage of installation, curing is what develops the bond strength needed to support years of daily use. Waiting the recommended time before walking on tiles, grouting, or placing heavy loads helps prevent common issues such as loose tiles, hollow sounds, cracked grout joints, and premature installation failure.
If you're planning a residential, commercial, or industrial tiling project, using high-quality installation materials and following the correct installation sequence will deliver the best results. Explore the complete range of professional tile installation solutions from Lapifix, including tile adhesives, grouts, and structural fixing products. Choosing the right products—and giving them the time they need to perform—helps ensure a strong, reliable finish that lasts for years.
Tile adhesive drying time varies depending on the product, tile size, temperature, humidity, and substrate conditions. Under normal circumstances, many cement-based adhesives are ready for grouting after approximately 24 hours, but always follow the manufacturer's instructions.
Drying refers to the stage where moisture evaporates and the adhesive hardens sufficiently for the next installation step. Curing is the longer process during which the adhesive develops its full mechanical strength and long-term durability.
Most manufacturers recommend waiting until the adhesive has completed its initial drying stage before grouting. For standard cement-based adhesives, this is commonly around 24 hours, although large-format tiles, cool temperatures, or high humidity may require longer.
Light foot traffic is generally permitted only after the manufacturer's recommended waiting period has elapsed. Heavy traffic, furniture, and concentrated loads should be delayed until the adhesive has achieved adequate curing.
Yes. Lower temperatures slow both drying and cement hydration, extending the time required for the adhesive to develop sufficient strength. Always install tiles within the temperature range specified by the adhesive manufacturer.