Introduction
Wall putty keeps a very important place in interior and external wall treatment as a preliminary measure preceding the preparation introducing paint or wallpaper. It helps to make the surface nice and smooth, with no defects and imperfections on it and enables the finishing product to appear polished and professional. Be it do-it-yourself life or professional contracting business, knowing the proper method of using the wall putty may make a big change in the endurance and beauty of your walls.
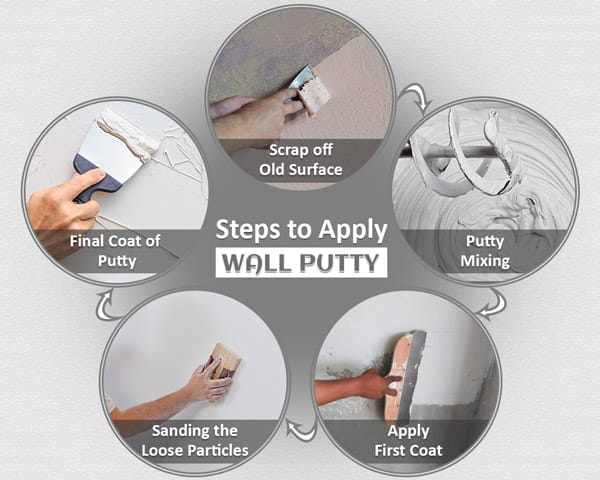
This guide will take you through a detailed, step to step application of the wall putty process starting with the preparation of the surface, sealing the surface to the final paint application that ensures the best and durable final finish.
What is Wall Putty?

Wall putty is a fine power substance made of cement that is combined with water to come up with a smooth paste. It is used on walls and ceiling prior to painting to provide a smooth surface. Wall putty is mainly of two types named interior wall putty and exterior wall putty. Although interior putty is sheltered to smoothen and grade interior surfaces, exterior putty is stronger and resistant to climatic changes to be applied in exterior walls.
Wall putty is widely known as skim coat; mixture constituting wall putty is by use of white cement, polymers and minerals. Its key features are strong adhesion, smooth finish, resistance of water, and being compatible with all sorts of paints. The wall putty gives a smoother and finer base to the decorative finish in comparison to the plastering methods.
Why Wall Putty is Essential Before Painting
Applying wall putty before painting is more than just a surface treatment it’s a critical step for achieving a long-lasting and appealing finish. Here are the key reasons why:
- Surface Smoothness: Wall putty gets into the cracks, dents and holes making the place smooth. A smooth surface makes the paint glide smoothly on the whole surface without any patches.
- Paint Adhesion: It also enhances the sticking of the paint on the wall and thus lessens the chances of peeling and flaking of the paint especially over time.
- Durability: A putty-treated wall is more resistant to moisture, minor impacts, and environmental wear, increasing the longevity of both the wall and the paint.
- Aesthetic Finish: Wall putty enhances the vibrancy and smoothness of the paint, making colors appear more consistent and rich.
Use the appropriate groundwork with wall putty and you protect the money you spend on wall paints and cushion the life of your wall surfaces.
Step 1: Surface Cleaning and Preparation
Step 2: Applying Primer (If Required)
Step 3: Mixing the Wall Putty
Step 4: Applying the First Coat of Wall Putty
Step 5: Drying the First Coat
Step 6: First Sanding Process
Step 7: Applying the Second Coat
Step 8: Final Drying and Curing
Step 9: Final Sanding for Smooth Finish
Step 10: Wall Inspection Before Painting
Step 11: Painting Over Wall Putty
Materials and Tools You Will Need
It is important to collect the materials and tools in place before the process of application of the wall putty commences. It will be efficient to have all the materials at hand, which will produce a good quality final effect.
Essential Materials:
- Wall Putty: Select a product of high-quality depending on the type of the wall. The common choices are white cement-based puttys in interior settings and weather-proof types in exterior settings.
- Primer (optional): Required for certain wall types, especially those with high porosity or previous paint damage.
Tools and Equipment:
- Mixing Bucket: For combining putty and water in the correct ratio.
- Putty Blade/Spatula: Used for applying putty evenly on the wall.
- Electric Mixer or Drill with Mixing Paddle: Ensures a lump-free and smooth consistency.
- Sandpaper (various grits): For smoothing the surface between coats.
- Sponge and Cloth: To wipe dust and clean the surface.
- Cleaning Tools: Wire brush, broom, and mild detergent to clean the wall prior to application.
Protective Gear:
- Gloves and Safety Goggles: Protect your hands and eyes from dust and chemicals.
- Dust Mask: Prevents inhalation of fine particles during sanding and mixing.
Step 1: Surface Cleaning and Preparation
Wall putty requires proper preparation of the surface as the basis of its success. It gives improved adhesion, reduces flaws on the surface, and stops future damages.
Here’s how to clean and prepare the wall:
- Remove Old Paint or Debris: Use a wire brush or putty scraper to get rid of flaking paint, grease, or any loose particles.
- Wash the Wall: Clean the surface with water and a mild detergent solution to remove stains, oil spots, and contaminants.
- Dry Completely: Ensure the wall is completely dry before proceeding.Poor bonding and cracking may be as a result of moisture.
- Sand the Surface: Light sand the rough places with medium-grit sandpaper to provide an even surface on which putty would stick.
- Check for Moisture Patches: Walls with damp spots should be treated or repaired before applying wall putty.
The putty needs a clean dry and dust free wall in order to do its work well and last long.
Step 2: Applying Primer (If Required)
Primer isn’t always necessary, but in certain conditions, it can significantly improve the performance of wall putty and the final paint.
When to Apply Primer:
- The wall is stained, newly plastered, or porous.
- The surface has been exposed to moisture or chemical treatment.
- Manufacturer instructions recommend its use.
How to Apply Primer:
- Choose the Right Primer: Water-based or oil-based primers are available depending on your wall’s needs.
- Apply Evenly: Use a roller or brush to coat the wall. Avoid thick patches or drips.
- Drying Time: Allow the primer to dry for 12 to 24 hours, as recommended by the manufacturer.
- Inspect the Surface: Make sure the primer is dry, clear, and smooth before applying the putty.
Applying a primer can strengthen the bond between the wall and the putty, resulting in a longer-lasting and better-looking finish.
Step 3: Mixing the Wall Putty
It is important to reach a desired consistency, which is productively applied and easily finished. Properlymixed wall putty is spread easily and also adheres to the wall well.
Steps to Mix Wall Putty Correctly:
- Prepare a Mixing Container: Use a clean plastic bucket or container that can hold the quantity you need.
- Follow the Ratio: The quantity of clean water should be added in the bucket followed by gradual addition of the wall putty powder. It is usually 2 parts of powder and 1 part of water, always following the manufacturer's instructions.
- Mix Thoroughly: Combine all the ingredients together using an electric mixer or a drill with a paddle attachment until the mix is lump-free and smooth. It can also be done manually by using a putty blade; the only thing is that it takes some efforts.
- Consistency Check: The mixture should be creamy and free from lumps—not too watery or too thick.
- Use Within 2 Hours: Mixed putty has a working time. Do not prepare large quantities of liquid which may be dried before it is used.
Proper mixing lays the groundwork for a uniform application, minimizing chances of cracks or weak adhesion.
Step 4: Applying the First Coat of Wall Putty
Now you are ready to apply the first layer after the putty mix is ready. This coating is used to smooth the irregularities of the surface and cover the small irregularities.
Application Technique:
- Start from the Bottom or a Corner: The Putty blade/spatula should start with application on the bottom of the wall or a corner and going upwards or outwards with even strokes.
- Keep It Thin and Even: Apply a thin, consistent coat across the wall, avoiding thick patches.
- Spread Uniformly: Exercise a consistent hand pressure during the spread so as to eliminate ridges as well as uneven spreading.
- Edge Work: Note to be careful at corners, edges and by electrical points for a seamless appearance.
Tips:
- Don’t overwork the area. Apply and move on; you can smoothen in the next steps.
- Use different blade sizes for wide walls and narrow sections.
The first coat is not about perfection — its goal is to build a solid foundation and cover surface irregularities.
Step 5: Drying the First Coat
The drying stage plays a significant role, which is directly associated with the finishing and the lasting of the wall putty. This process should not be rushed, but it may turn into cracking or peeling.
Drying Guidelines:
- Standard Time: The base coat should then dry in 6-8 hours.
- Check Humidity and Temperature: In humid or in cold regions, it may take more than 12 hours to dry.
- Avoid Direct Sunlight: Wait till the wall is dried in shaded conditions. Harsh sunlight can lead to quick drying and cracking.
- Test Before Moving On: Touch the surface with the tip of a finger- cool and firm and you should be ready to continue.
By being patient when it comes to the drying process, you will end up with a better foundation, and also you will notice that the next coat will run smoothly.
Step 6: First Sanding Process
The next very important procedure is after the first coat has been thoroughly dried, sanding then follows. This is to eliminate corruptions and get the smooth and level surface to work in when using the next coat.
How to Sand the First Coat:
- Use Medium-Grit Sandpaper (180–220 grit): Gently sand the wall using circular or horizontal strokes.
- Check for Rough Spots: Concentrate on certain locations that have some bumps, tool marks or uneven areas.
- Even Pressure: Sanding should be done with even pressure in order to avoid sinking of putty layer.
- Dust Removal: Wipe off the dust with a clean, damp sponge or microfiber cloth. A soft brush attachment vacuum may also prove useful.
Tip: Wear a dust mask and safety goggles during this step to avoid inhaling fine particles.
Proper sanding sets the stage for a smoother second coat and improves overall finish quality.
Step 7: Applying the Second Coat
The second one is a wall putty that makes an even smoother surface without the slight damage retained after the first application and sanding.
Steps for a Smooth Second Coat:
- Use Freshly Mixed Putty: Prepare a new batch of putty with the same consistency as before.
- Apply a Thinner Layer: The second layer must be lighter and thinner as compared to the first one. It is used to perfect smoothness of the wall.
- Follow the Same Technique: Follow the same technique and apply vertically or diagonally with a putty knife or trowel and have even pressure.
- Cover Missed Spots: Pay attention to areas missed or imperfect in the first coat.
Pro Tip: No over-doing it. The thinner the layer, the easier it dries and can be sanded to a smooth finish.
The second coat is the chance you have at getting that smooth shiny surface that is the basis of having a perfect paint job.
Step 8: Final Drying and Curing
Once the second coat has been done, it is important to permitting adequate drying and curing time so that the putty can cure and be ready to get the final finishing.
Best Practices for Final Drying:
- Drying Time: Allow at least 8 to 12 hours for complete drying. In humid climates, it might take up to 24 hours.
- Avoid Disturbance: It is necessary to keep the place undisturbed at this time of anticipating dents, scratches and contamination by dust.
- Proper Ventilation: Make sure that there is circulation of air to accelerate the curing process.
- Check Dryness: The wall should feel dry to the touch and have no cool or damp spots.
Curing is also an important process that determines the life span of the wall and preparedness to the last stages of sanding and painting.
Step 9: Final Sanding for Smooth Finish
Once the second coat has dried properly, it is vital to carry out an ending round of said sanding to smooth out the surface of the wall before painting.
How to Perform Final Sanding:
- Use Fine-Grit Sandpaper (320–400 grit): This ensures a silky-smooth finish without scratching the surface.
- Gentle Pressure: The movement is gentle by making use of even strokes which lightens any excessive flatness without damaging the subject too much.
- Focus on Flaws: Look for minor bumps, lines, or patches and smooth them out.
- Clean Thoroughly:Place an old sponge or a piece of cloth, which is soft, in a container with some water and wipe the wall above it to remove all dust particles.
Why It Matters: Final sanding eliminates tiny imperfections and gives the paint a flawless surface to adhere to, improving both appearance and longevity.
Step 10: Wall Inspection Before Painting
Examine carefully the painting wall before you pick up the brush in case you missed something.
Checklist for Inspection:
- Are there any visible cracks, pinholes, or rough spots?
- Is the wall entirely dry and free from moisture?
- Have all dust particles from sanding been removed?
- Is the surface uniformly smooth to touch?
Pro Tips for Inspection:
- Use side lighting (a flashlight or work light) to detect shadows from imperfections.
- Run your hand across the wall to feel for roughness.
A thorough inspection at this stage can prevent poor paint adhesion and unsatisfactory final results.
Step 11: Painting Over Wall Putty
Your wall is now ready to accept the paint and now, the vision that you have in mind can be achieved.
Painting Guidelines:
- Choose the Right Paint: Emulsion paint can be used on walls with putty. The use of water-based paints is compatible and gives smooth finish.
- Apply a Base Coat or Primer (if needed): This ensures color vibrancy and better bonding.
- Use Proper Tools: Rollers are the best tool to cover large surface areas, whereas edges should be covered with the help of a brush.
- Apply Multiple Coats: Two to three coats would be desired. Make sure that one coat dries, then apply the next one.
Important:Take note of the drying procedure of the particular paint manufacturer and make sure that the wall is not subjected to water or the dust until completely dried out.
When wall putty is used correctly, then it should be painted over and it forms a professional decorated look with complexion lasting many years with minimum care.
Common Mistakes to Avoid When Applying Wall Putty
Although applying a wall putty may appear easy, there are some steps that one ignores, hence affecting the final product. These are some basic mistakes to avoid, to get a lasting, trouble free finish:
- Skipping Surface Preparation:When the putty is applied on a dirty or a wet wall, it lacks stickiness and this causes the wall to crumble or peel off.
- Improper Mixing:A lot of water being used or failure to properly mix would amount to a weak mixture that will not bond properly.
- Ignoring Drying Time: Skipping the step between coats of paint or sanding too soon may lock moisture into the paint and leave bubbles or cracks.
- Uneven Application: Applying inconsistent thickness or neglecting certain areas results in an unbalanced surface.
- Over-sanding: Sanding too much may sacrilege the layer of putty and bring out the substrate- which is the opposite goal of puttying.
Avoiding those traps will guarantee the clean and professional-looking look that can run throughout ages.
Maintenance Tips After Wall Putty Application
After your wall has been puttied and painted, there are a couple of maintenance tips you could introduce to help maintain the look and structure of your wall:
- Routine Cleaning: Dust walls by cleaning them with a dry cloth or sponge that has some water. This will keep walls dirt-prone without soaking the paint.
- Touch-Ups: Smaller dents or cracks can be addressed immediately by applying a light coat of putty on it and covering it with a touch-up paint.
- Avoid Harsh Chemicals:Never use abrasive cleaners or solvents, which will damage the paint and the underlying putty.
- Control Humidity: Keep good ventilation so that there is no surplus moisture as well as it derangs the physical strength of the putty and paint layers.
- Periodic Inspection: Walls should be inspected once a year and these walls must be looked upon to check whether it is flaking or cracked or discolored.
With these care tips, your walls will maintain their flawless look and structural integrity over time.
Conclusion
Wall putty application can be referred to as a small segment of the overall painting project, yet its contributions to the final project are significant. As well as building up paint durability, a good putty job prepares the way towards an excellent finish when it comes to surface beauty.
In painting your house whether it be a do it yourself or a business project setting aside the time to complete the steps including preparing the surfaces to the final painting will be valued in the performance and the final result. Now that you have the instructions in this step-by-step tutorial, you can be able to do walls with much smoother and lasting results and that actually stand out.
Frequently Asked Questions (FAQs)
1. Can wall putty be used on damp walls?
No, applying putty on damp walls is not recommended. Moisture compromises adhesion and can cause bubbling or peeling. Always ensure the surface is completely dry before application.
2. Is primer always necessary before applying wall putty?
Not always. Primer is typically used on highly porous, newly plastered, or damaged surfaces. Check the manufacturer's instructions and assess your wall condition to decide.
3. What is the ideal temperature for applying wall putty?
The optimal temperature range is between 25°C to 35°C (77°F to 95°F). Avoid applying putty during extreme cold, rain, or high humidity.
4. How soon can I paint after applying wall putty?
Wait at least 24 hours after the second coat and final sanding. Ensure the wall is completely dry and dust-free before painting.
5. Can I use wall putty on ceilings?
Yes, wall putty is suitable for ceilings as well. The process is similar, but you’ll need extra care during application and sanding due to overhead positioning.