
Grouting is important both from the point of view of structure and appearance of tiles. It fills voids, does not allow moisture penetration, and adds the cosmetic value to tiled areas. Among all the range of grout options, cementitious grouts, being the traditional in nature and used most commonly, especially in residential and light commercial cases. They are affordable and easy to apply and they also have the versatility factor that makes them the preferred option for professionals as well as the DIY enthusiastic.
The Portland cement, fine sand, and more water retention agents make up the cementitious tile grouts. They are mixed with water to produce a paste that infiltrates the gaps between tiles to make a firm bond and sealed surface. There are several formulations and color of Cementitious grouts, depending on project needs.
They are ideal for indoor uses with average levels of moisture. Unlike epoxy or furan grouts, cementitious variants are more tolerant of error during application but are porous and usually need to have a coating applied to them to avoid staining or water damage. In spite of these limitations, their cost-effectiveness and flexibility has left them in immense use for decades.
Sanded Cementitious Grout
Unsanded Cementitious Grout
High-performance Cement Grouts
Polymer-Modified Cement Grouts
1. Sanded Cementitious Grout : Sanded grout has coarse particles of grains of sand and is applied in case of tile joints greater than 1/8 inch( 3 mm). The inclusion of sand adds strength and also the possibility of shrinkage and cracking is minimized. It is widely utilised on flooring applications where tiles bear heavy weight and constant usage.

Best suited for: Floor tiles, large format tiles, outdoor installations
Advantages: Durable, economical, resists cracking
Limitations: Not suitable for soft or polished tiles as it may scratch the surface
2. Unsanded Cementitious Grout : The unsanded version has a smoother surface and has not got coarse bits of sand that are present in the sanded version. It is for small gap (less than 1/8 inch) and vertical surface where greater adhesion is required. It is perfect for wall tiles and light for glass or polished stones.
Best suited for: Wall tiles, bathroom walls, kitchen backsplashes
Advantages: Smooth finish, ideal for vertical surfaces, less abrasive
Limitations: Can crack or shrink in wider joints due to lack of structural bulk
3. High-performance Cement Grouts (ANSI A118.7 compliant) : These are cementitious based grouts that have been customized in order to meet increased performance standards. They usually contain polymer additives that increase water resistance, minimize efflorescence, and this increases flexibility. Such grouts are the best for wet areas and highly trafficked areas
Best suited for: Showers, commercial kitchens, outdoor patios
Advantages: Stronger, more resistant to moisture and stains, longer-lasting
4. Polymer-Modified Cement Grouts : Modified grouts with polymers through admixture of latex or others make-up polymer-modified grouts, with high bonding, flexibility and durability. They are very flexible to different situations such as slight substrate movement and temperature fluctuations.
Best suited for: Areas with minor substrate movement, exterior walls, floors with radiant heating
Advantages: Flexible, increased durability, excellent adhesion
Limitations: Slightly more expensive and may require careful mixing and application
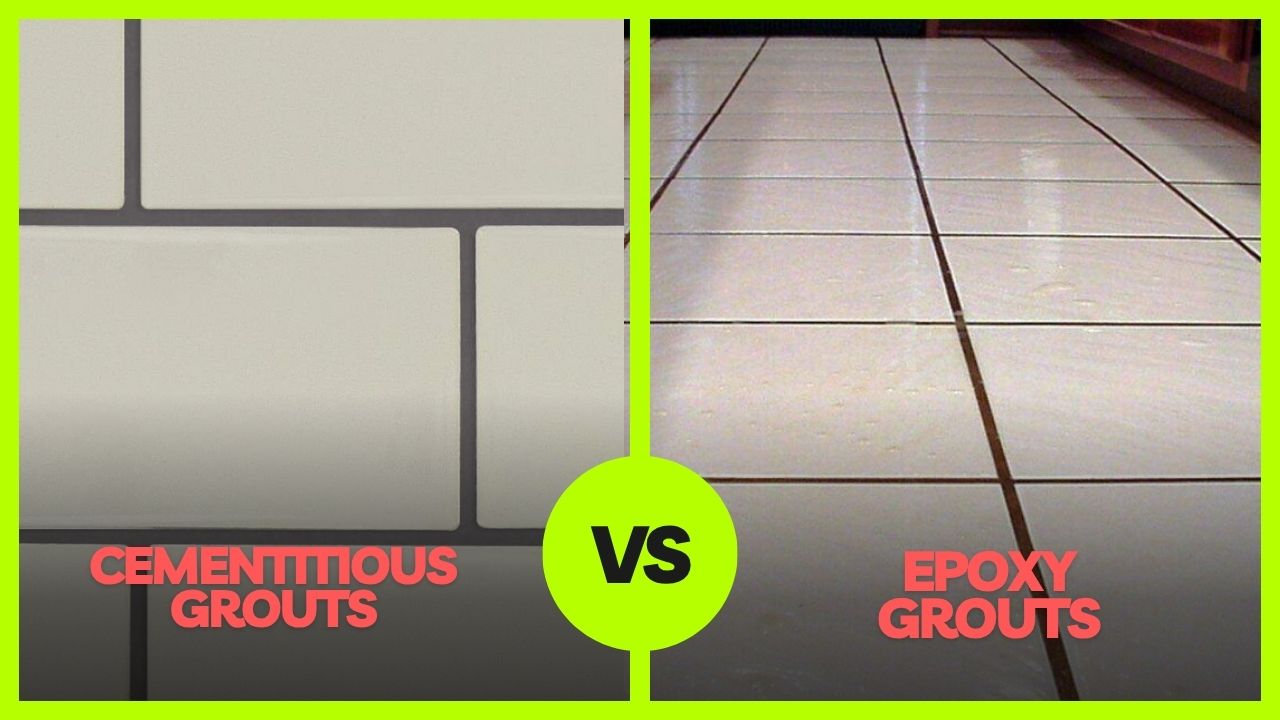
One of the most common dilemmas when selecting grouts include; cementitious or epoxy grouts. They have both unique properties that make them acceptable for various applications.
The cementitious grouts also are cement based and their ingredients include cement, sand and other additives. They become easier to work with; more forgiving at application. Also, they are cheaper and come in many colors and formulations.
On the other side, Epoxy grouts are materials based on resins and hardeners, which makes a non porous and durable bond. They have an extraordinary resistance to stains, chemicals and moisture, thus they are perfect for high traffic and wet areas such as in commercial kitchens, in industrial areas and in swimming pools. However, it is more difficult to apply, it dries out faster, and is much more expensive.
In brief, cementitious grouts will suffice for most residential and moderate use applications while epoxy grouts are more appropriate to more narrow applications of specialized, high-performance uses.
|
Feature |
Cementitious Grout |
Epoxy Grout |
|
Composition |
Portland cement, sand, additives |
Epoxy resins, hardeners, fillers |
|
Ease of Application |
Easy to mix and apply, beginner-friendly |
Requires skill, shorter working time |
|
Water Resistance |
Porous, needs sealing for water protection |
Non-porous, highly water-resistant |
|
Stain Resistance |
Moderate (improves with sealing) |
Excellent, resists most stains |
|
Durability |
Good for residential use |
Extremely durable, suitable for heavy use |
|
Cost |
Affordable |
More expensive |
|
Maintenance |
Requires periodic sealing and cleaning |
Low maintenance |
|
Ideal Applications |
Indoor floors, walls, light to moderate use |
Commercial kitchens, pools, hospitals |
|
Color Options |
Wide variety available |
Fewer color choices |
|
Working Time |
Longer, more forgiving |
Short, needs fast and accurate work |
|
Clean-up |
Easy with water |
Requires special solvents |
|
Curing Time |
24–72 hours |
Faster curing |
Cementitious tile grouts continue to be popular due to several advantages that meet the needs of a wide range of tiling projects:
Affordability: One of the cheapest grouting options hence ideal for budget-conscious projects.
Ease of Application: Easy mixing and application process that is easy for DIYers.
Wide Availability: Easily available in hardware and construction supply outlets, in different colours and texture.
Customizable Appearance: May be pigmented to coordinate or contrast with the color of tiles for versatile designing.
Repairability: Less challenging to regrout or fix as opposed to resin-based competitors.
These benefits make cementitious grouts a practical choice for general-purpose tiling in homes and offices.
Despite their many benefits, cementitious grouts have some limitations that should be considered when choosing the right material for your project:
Porosity: The cement-based grouts are porous; therefore, they can take in water and stains unless fully sealed. This might cause the discoloration and degradation in the long run.
Maintenance Needs: Periodic sealing is suggested to sustain performance with particular emphasis in areas, where moisture is a problem.
Susceptibility to Cracking: On the long run, particularly where there is substrate movement, the cementitious grouts are prone to cracking or shrinking.
Not Ideal for Heavy Industrial Use: Although there are improved variants, the standard cementitious grouts are not as strong as industrial or chemical heavy application epoxy options.
Understanding these limitations allows for better planning and long-term satisfaction with your tile installation.
Cementitious grouts are incredibly versatile and can be used in a wide range of environments. Their flexibility in application makes them especially suitable for:
Residential Kitchens and Bathrooms: Perfect for flooring, backsplash, and wall tiles for medium traffic and moisture.
Indoor Floors and Walls: Installed in the living rooms, hallways, and in the bedrooms along with the ceramic or porcelain tiles.
Dry Areas: Ideal for a foyer or a dry utility room where water exposure can be minimal.
Moderate Moisture Zones:Proper sealing allows them to work even in those areas with occasional exposure to water, like in powder rooms or lightly utilized showers.
By selecting the right type of cementitious grout, homeowners and professionals can ensure both durability and visual appeal in these settings.
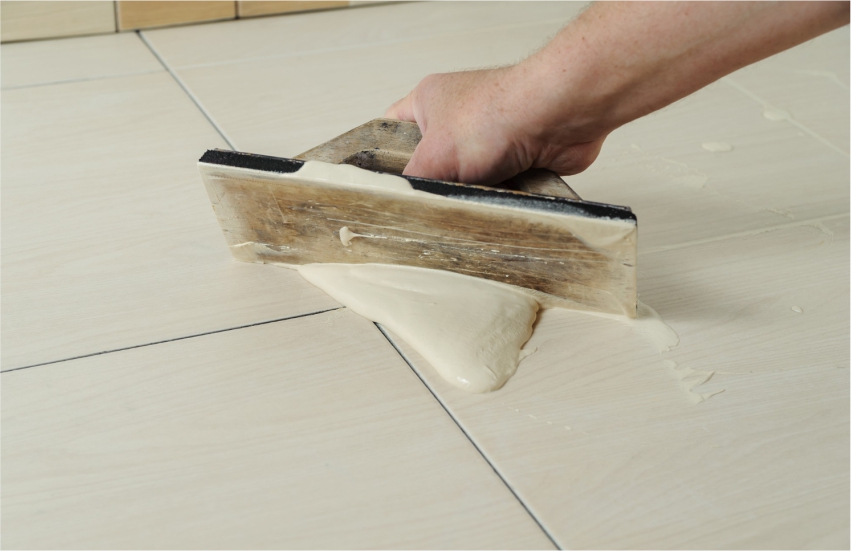
Proper mixing and application are essential for achieving a durable and professional finish with cementitious grouts. Here’s a step-by-step overview:
Prepare the Surface: Make sure that the tile joints are free of dust and or debris.
Mix the Grout: Mix the dry powder of the grout with clean water in accordance with the manufacturer’s recommendations. Whisk until you get a smooth peanut butter-like consistency.
Let it Slake: Leave the grout to slake for 5-10minutes before remixing for a short while. This activates all chemical components.
Apply the Grout: Use a rubber grout float to spread the mixture diagonally onto the tiles to squeeze it hard into the joints.
Clean the Excess: After 10-15 minutes, clean the excess grout off the tile surfaces with a damp sponge.
Buff and Polish: After the grout has hardened slightly polish the tile surface with a dry cloth in order to remove haze.
Avoid common mistakes such as overwatering the mix or failing to slake, as they can weaken the grout and cause future issues.
Curing cementitious grout is as crucial as its application. Curing is the process by which the grout gains its full strength and durability. Here are some key practices to follow:
Initial Set Time: Leave the grout to settle for a minimum of 24 hours before you expose it to light traffic.
Full Cure Time: In most cases, the complete curing for cementitious grouts takes about 72 hours, depending on the degree of temperature and humidity conditions.
Environmental Factors: Long curing durations may be enhanced by high rates of humidity and low temperatures while hot, dry climates may cause it to speed up too quickly, subjecting it to the risk of shrinkage.
Sealing: After being completely cured, apply a grout sealer for better stain resistance and water repellency, particularly on wet or high traffic surfaces.
Following these best practices ensures the grout performs well over the long term, reducing the need for maintenance or early replacement.
Maintaining cementitious grout is essential to preserving both the function and appearance of tiled surfaces. Here are some practical tips:
Regular Cleaning: Clean grout lines using pH-neutral cleaner and soft brush to get rid of dirt and grime. Use chemicals that are not too abrasive that could eat away the grout.
Sealing: Use a penetrating sealer once in a while, 6 to 12 months, in high moisture or high traffic areas to safeguard the grout against staining and moisture soaking.
Quick Spill Management: Clean spills promptly in order to avoid deep staining particularly when it comes to oil based substance or colored liquids such as wine and coffee.
Mildew and Mold Control: Provide proper ventilation- blowers- in bathrooms and kitchens, and clean the grout lines with a mild solution of vinegar if mold or mildew appears.
Routine maintenance not only enhances durability but also keeps your tile installation looking fresh and clean over time.
With time, even the best applied grout may start to exhibit signs of wear and discolouration, or crack. Regrouting will help to give back the integrity and beauty to your tiled surfaces at low cost.
When to Regrout: It is advisable to regrout if the grout is discolored, starting to crack, or letting water through..
Removal Techniques: Cut the old grout with the help of grout saw, an oscillating multi-tool, or a carbide-tipped tool minding not to damage the tiles.
Surface Prep: Vacuum or wipe down the joints to make sure no debris and dust is left before applying new grout.
Reapplication: Remix and apply new cementitious grout using conventional measures while the curing and sealing processes should be done appropriately.
Regrouting is particularly useful in bathrooms and kitchens where moisture and frequent cleaning take a toll on the grout over time.
Cementitious grouts are reliable but can face issues if not properly applied or maintained. Here are some common problems and how to address them:
Efflorescence: A white chalky residue that is a product of moisture that brings out minerals to the surface. Clean it with a special efflorescence remover and seal the grout not to allow its comeback.
Cracking: May be caused due to the movement of the substrate, large joints, or unsuitable mixing. Use flexible, polymer-modified grout in subject to movement areas, and always mix according to guidelines.
Discoloration: Frequently because of dirty water when mixing or poor sealing. Do not mix with dirty surfaces or distilled water before use..
Shrinking or Flaking: Usually caused by over watering the mix or too early drying. Always follow the instruction of the manufacturer and ensure sufficient curing time.
Identifying and correcting these issues early ensures the longevity and aesthetic value of your tiled spaces.
Selecting the correct cementitious grout involves more than just picking a color. Several key factors must be considered:
Tile Type:The delicate tiles such as polished marble or glass are to be combined with the unsanded grout to prevent scratching while stronger materials can withstand sanded ones.
Joint Width: Where the joints are greater than 1/8-inch in width, use sanded grout; for narrower joints, unsanded grout is recommended.
Location: For wet regions such as bathroom or kitchen, high-performance or polymer-modified grouts will provide the better water resistance and strength.
Movement Tolerance: In regions where there are structural movement or change of temperature, a flexible polymer-modified grout may avoid the possibility of cracking.
Design Aesthetics: The color is also very decisive in the finished product. Light-color grout can help to brighten an area, while darker grout has a tendency to cover stains and produce contrast.
Properly evaluating these factors ensures a long-lasting and visually appealing tile installation.
Modern cementitious grouts have evolved to meet environmental and health standards. Here’s what you should know:
Low VOC Formulations: Many manufacturers have since started producing low or zero-VOC (volatile organic compounds) grout products, hence cutting on the indoor air pollution and health risks.
Eco-Friendly Options: Some of the grouts contain recycled content or are based on sustainable materials, assisting you in decreasing your carbon footprint.
Safe Handling: Also remember to put on gloves, eye protection, and a dust mask when working with dry grout because of skin irritation and inhaling particles.
Disposal: As for remnants of grout – they should only be discarded as per local laws. Do not rinse into drains or into systems used to convey water, since the cement can harden and stop the movement of water.
Opting for eco-conscious products and following safety practices ensures a responsible installation process.
Cementitious tile grouts continue to be a staple when it comes to tiling, due to flexibility, ability, and convenience. If you are remodeling bathroom, kitchen back splash or even living room floor, there is a type of cementitious grout that works.
From sanded and unsanded versions to high-performance and polymer modified kind, knowing their characteristics and limitations, is primary for functional and artistic accomplishment. With the right selection, application and maintenance, cementitious materials can give a strong and finish that is long lasting, clean, and attractive for years.
Sanded grout includes coarse sand particles and is used for joints wider than 1/8 inch. Unsanded grout is smoother and better suited for narrow joints and delicate tiles.
For areas with moderate to high moisture exposure, grout should be sealed every 6 to 12 months to maintain water resistance and prevent staining.
Yes, especially polymer-modified or high-performance variants that offer improved weather resistance. Proper sealing is crucial for longevity.
Common reasons include overwatering the mix, improper curing, or substrate movement. Using a polymer-modified grout and following proper application techniques can help prevent this.
Yes, but it's best to use unsanded grout to avoid scratching. Also, pre-sealing the stone before grouting can help prevent staining from grout pigments.