
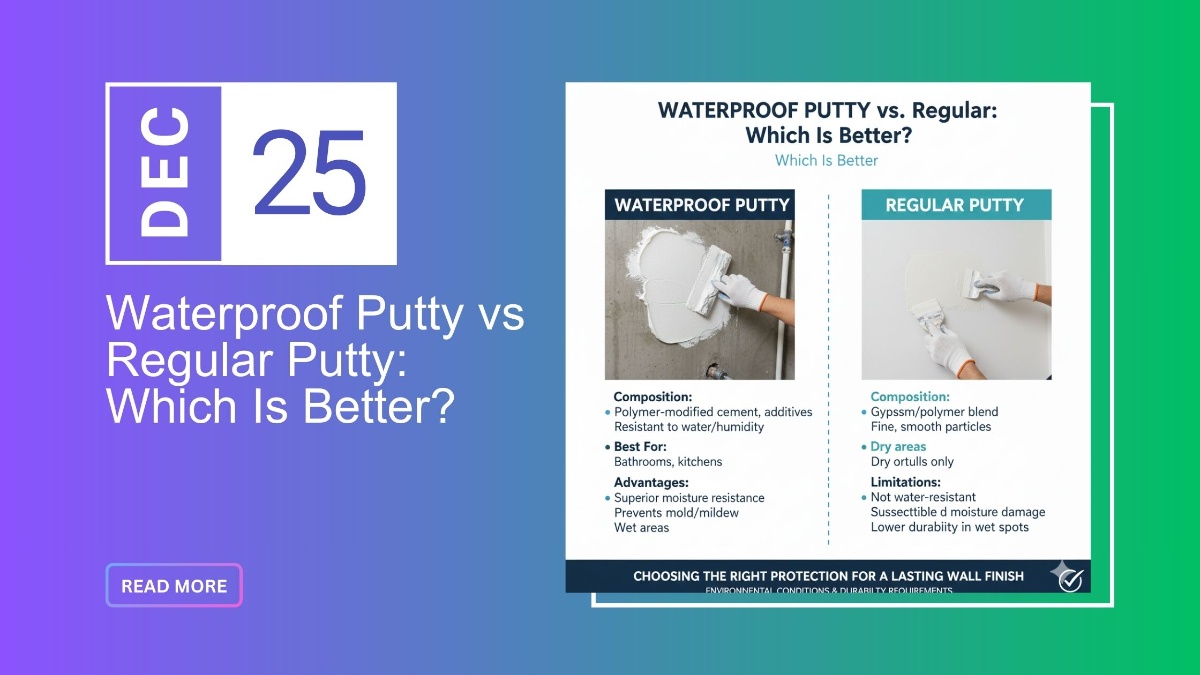
When it comes to achieving a smooth, durable, and long-lasting paint finish, wall putty plays a much bigger role than most homeowners realize. Whether you’re renovating an old space or painting a newly constructed home, choosing the right type of putty ensures better adhesion, stronger walls, and long-term protection. Today, the two most commonly used options are regular wall putty and waterproof wall putty but they perform very differently in real-life conditions.
Humidity, moisture seepage, and temperature changes can severely damage walls if the wrong putty is used. That’s why builders, contractors, and homeowners often compare waterproof putty vs regular putty to understand which is better suited for their space.
In this guide, we break down the composition, durability, applications, cost differences, pros and cons, and expert recommendations to help you make the right choice. Whether you're working on interior walls, exterior facades, bathrooms, or repainting projects, this detailed comparison will help you avoid common mistakes and choose a putty that protects your home for years.
Regular putty is a cement-based smoothening compound applied on internal plastered surfaces to prepare them for painting. It helps achieve an even, blemish-free finish by filling minor cracks, pinholes, and surface irregularities. Because it is made from simple materials and has low moisture resistance, regular putty is mostly used in dry interior areas where humidity is not a concern.
This type of putty is widely preferred for cost-effective painting jobs, renovation projects, and standard interior construction because it provides decent finishing at an affordable price.
Regular putty is formulated using basic construction-grade materials. Each ingredient plays a specific role:
This forms the main base of the putty. White cement provides initial hardness and improves the overall surface strength of the wall. It helps the putty bond with the plaster and creates a solid foundation for paint.
These are fine particles added to improve smoothness and surface texture. Mineral fillers also enhance workability, making the putty easier to spread during application.
Regular putty contains polymer binders, but in very limited amounts. This small quantity improves adhesion but does not provide strong flexibility or waterproofing. Because the polymer content is low, regular putty cannot resist moisture effectively.
The mixture uses water as the solvent, which allows easy blending and spreading. However, this also means the putty is more likely to absorb moisture, especially in humid conditions.
Why this composition matters: Since regular putty’s formulation relies heavily on cement and fillers not polymers it lacks the hydrophobic (water-repellent) properties found in advanced waterproof putties.
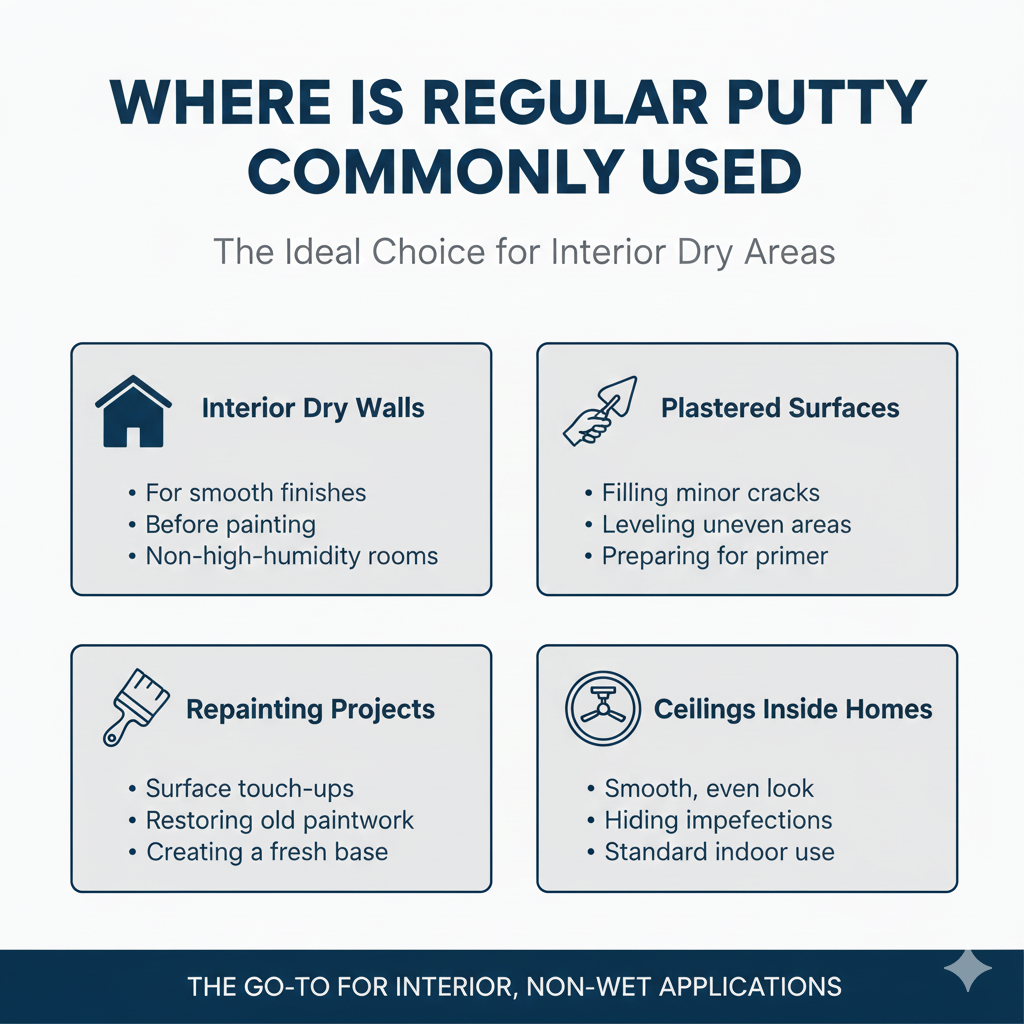
Regular putty is suitable only for surfaces that remain dry throughout the year. It is most effective in interior environments that do not face moisture seepage, water contact, or humidity issues.
Walls inside living rooms, bedrooms, offices, and shops are ideal for regular putty because they stay dry and stable.
Fresh plaster that has dried properly offers a strong base for traditional wall putty. It helps level uneven plaster and creates a uniform texture.
During renovation, regular putty is used to fix small cracks, scratches, and old paint marks before repainting. Its smooth finish enhances the final paint appearance.
Interior ceilings, which are not exposed to weather or water, are also suitable for regular putty application.
Regular putty offers multiple benefits, especially for interior projects and budget-oriented applications:
It provides a clean, even surface that enhances paint adhesion and helps achieve a premium-looking finish.
Regular putty is significantly more economical than waterproof or polymer-based putty. It lowers the overall painting cost, making it ideal for large interior projects.
Painters generally find regular putty simple to mix, spread, and sand. It does not require specialized tools or advanced skills.
It is widely available in hardware stores across India, making it a convenient choice for contractors and painters.
In areas where moisture is not a concern, regular putty performs sufficiently well and lasts for years.
Despite its widespread usage, regular putty has several important drawbacks especially related to moisture and durability.
Regular putty cannot resist water or humidity. When exposed to moisture, it absorbs water quickly, leading to various wall problems.
Humidity, dampness, or seepage can cause the putty to soften, weaken, or detach from the wall. This is especially common in monsoon-prone areas.
Because the polymer content is low, regular putty becomes brittle over time. In moisture-prone spaces, it develops cracks, flakes, or blisters.
Any area that has water exposure or weather conditions will damage regular putty quickly.
Paint applied over regular putty may peel or lose its sheen faster if the wall faces moisture issues.
Waterproof putty is a polymer-enriched, water-resistant wall finishing material designed to protect surfaces from moisture, dampness, and humidity. Unlike regular cement-based putty, waterproof putty forms a hydrophobic barrier on the wall, preventing water absorption and protecting the paint layer from blistering, peeling, or fungal growth.
It is engineered for high-moisture environments, making it ideal for bathrooms, kitchens, exteriors, and monsoon-exposed walls. Waterproof putty is widely used in modern construction due to its superior durability, long-term protection, and enhanced bonding strength.
The advanced formulation ensures your walls stay smooth, strong, and damage-free even in harsh weather or damp conditions.
Waterproof putty contains specialized, performance-enhancing components that make it stand out from regular putty.
A major portion of waterproof putty is made up of premium polymers. These polymers act as strong binders, improving flexibility, adhesion, and long-term strength. High polymer content also enhances the wall’s resistance to cracks and dampness.
These additives create a hydrophobic surface, which prevents water from entering the wall. This is the primary feature that makes waterproof putty suitable for wet and humid areas.
To combat dampness-related issues, waterproof putty includes anti-fungal agents that stop mold, mildew, and black patches from forming on the wall.
Ultra-fine, high-quality mineral fillers are used to achieve a smoother, premium surface finish compared to regular putty.
These binders strengthen the wall-putty bond, ensuring that the surface remains intact even during rainfall, humidity, or temperature changes.
Why this matters:The combination of polymers + additives makes waterproof putty highly durable, weatherproof, and suitable for both interiors and exteriors.
Waterproof putty is essential in all environments where moisture exposure is significant. Its water-repelling and anti-fungal properties ensure long-lasting wall protection.
High humidity and continuous water exposure can damage regular putty. Waterproof putty prevents damp patches, fungus, and paint bubbling.
Kitchens face steam, heat, and water splashes. Waterproof putty withstands these conditions without peeling.
Exterior surfaces are exposed to rain, sunlight, and pollution. Waterproof putty protects walls from weather damage, UV rays, and water seepage.
Balconies experience direct rainfall and temperature variation, making waterproof putty essential.
These areas often suffer from underground moisture and dampness. Waterproof putty prevents fungal growth and wall weakening.
For renovation work, waterproof putty is widely used to restore old, moisture-affected surfaces.
Hotels, restaurants, industrial kitchens, and public washrooms commonly use waterproof wall putty for longevity.
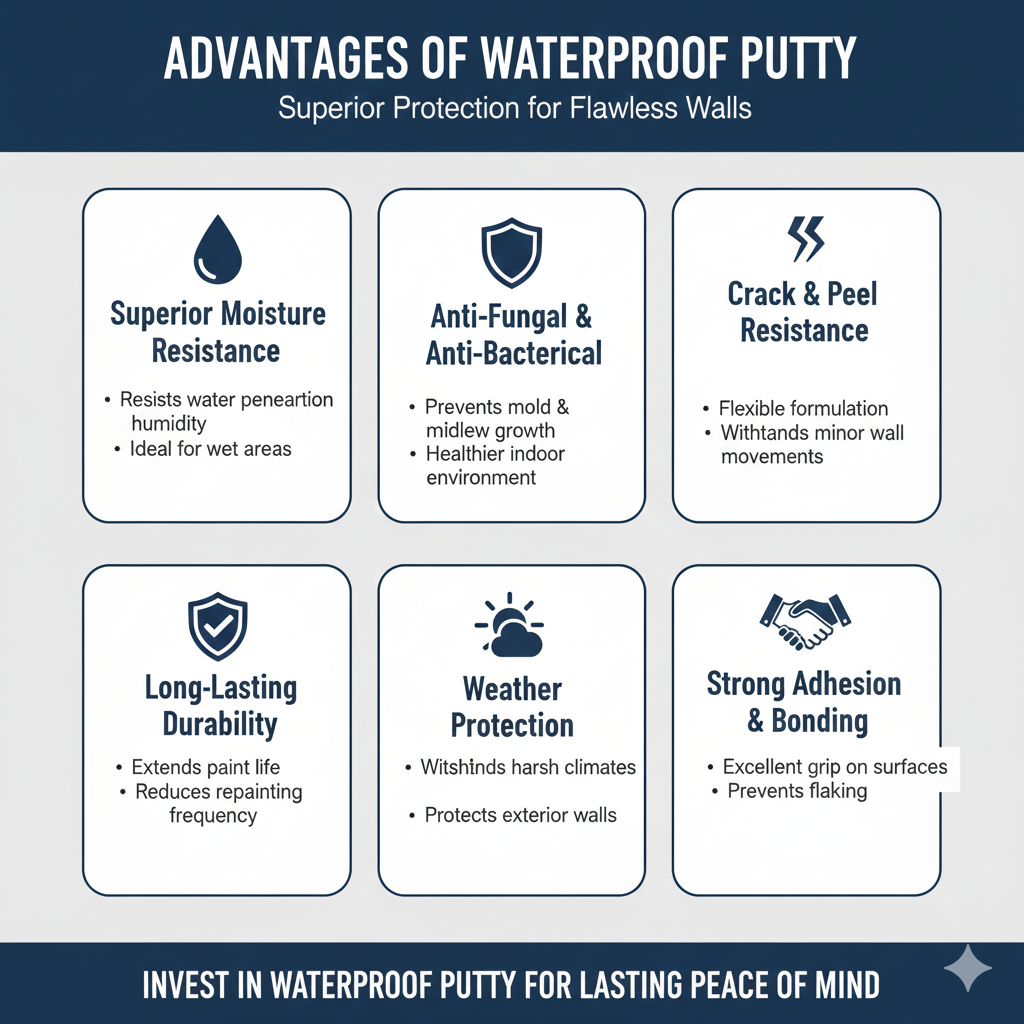
Waterproof putty delivers superior performance in terms of protection, finish, and durability.
It creates a protective layer that prevents water absorption and stops dampness from penetrating the surface.
Thanks to its anti-fungal agents, waterproof putty safeguards walls from mold, fungus, and black patches common in humid conditions.
High polymer content gives the putty flexibility, reducing crack formation, peeling, and blistering.
Waterproof putty improves overall wall strength, making paint last longer and look fresher over time.
Ideal for exterior use, it resists rain, sunlight, temperature changes, and monsoon-related damage.
Advanced binders ensure better bonding with wall surfaces, increasing the lifespan of the paint layers.
It provides a cleaner, smoother, and more refined surface for painting.
Although waterproof putty offers superior protection, it has a few limitations:
The advanced polymer-based formulation makes it slightly more expensive.
To achieve optimal performance, waterproof putty should be applied by trained professionals.
The wall must be cleaned and checked for structural moisture before applying a waterproof putty.
Stronger bonding properties may require longer curing for best results.
Despite these limitations, the long-term benefits often outweigh the cost difference, making waterproof putty a smart investment.
Choosing between waterproof putty vs regular putty can drastically impact the longevity and quality of your walls. Both serve the same basic purpose surface smoothening but their performance, durability, and moisture protection differ completely.
Below is a complete in-depth comparison that highlights how each type behaves in real-life wall conditions, especially in India’s humid climate.
| Feature | Waterproof Putty | Regular Putty |
|---|---|---|
| Composition | High polymers + waterproofing agents | Cement-based putty with low polymers |
| Water Resistance | Excellent moisture protection | Not waterproof |
| Durability | Long-lasting, flexible, high strength | Moderate; weak against dampness |
| Finish Quality | Ultra-smooth premium finish | Smooth but basic finish |
| Crack Resistance | High – flexible polymer structure | Low – cracks in humid areas |
| Anti-Fungal Protection | Yes (anti-fungal additives) | No |
| Ideal Usage | Bathrooms, kitchens, exteriors, balconies | Interior dry walls |
| Weather Resistance | Strong – rain/heat resistant | None |
| Cost | Higher | Lower |
| Paint Life | Longer-lasting | Shorter in humid areas |
This table helps readers instantly understand the practical difference between the two.
India experiences extreme climatic variations monsoons, humidity, heat, and coastal moisture. Here’s how both putties behave in these conditions:
Waterproof putty prevents dampness, fungal growth, and wall blistering.
Regular putty absorbs moisture, leading to cracks, flaking, and black patches.
During monsoons, seepage and humidity levels rise.
Waterproof putty protects exterior and interior walls from moisture.
Regular putty weakens, softens, and peels.
Both perform well, but waterproof putty still provides better longevity due to its polymer structure.
The durability of wall putty determines paint life and long-term maintenance costs.
? Lasts 8–12 years depending on maintenance
? Paint over waterproof putty stays brighter and smoother for longer
? Requires minimal repainting
? Bonds strongly even in harsh weather
? Lasts 3–5 years in normal conditions
? Lasts much shorter in humid/damp conditions
? Frequent repainting is needed
? Paint peels or cracks sooner
Using waterproof putty reduces the long-term expense of wall repairs, paint touch-ups, and crack-filling, especially in moisture-prone zones.
Many homeowners choose regular putty simply because it’s cheaper. But when you consider long-term costs, waterproof putty is often more economical.
Lower price
Good for dry areas
But needs frequent repainting and repairs
Higher initial cost
Reduces repainting frequency
Prevents damage, seepage, fungal growth
Saves money on major wall repairs
Best choice for long-term durability
Waterproof putty: No fungus, no dampness, long wall life
Regular putty: Severe paint peeling and moisture absorption
Waterproof putty: Resists rain and heat
Regular putty: Cracks and flakes easily
Regular putty: Works perfectly
Waterproof putty: Still better but optional
Waterproof putty: Repairs + protects
Regular putty: Fails quickly
Proper application is as important as product choice. Even the best waterproof putty will fail if the surface is dirty, damp, or applied incorrectly. Follow this professional workflow for durable, smooth, damp-resistant walls.
Tools & PPE
Steel trowel / putty knife (various sizes: 6", 10", 12")
Hawk board or mixing pan
Sanding block / 120–220 grit sandpaper
Roller & brush (for primer/primer sealer)
Sponge & clean rags / tack cloth
Measuring bucket / scale (for powder mixes)
Drill + paddle mixer (for premix consistency)
Moisture meter (recommended)
Ladder / scaffolding (for high walls)
PPE: respirator or dust mask, gloves, safety goggles, protective clothing
Materials
Waterproof putty (pre-mixed paste or powder)
Primer / primer sealer (alkali-resistant or acrylic primer as per putty datasheet)
Clean water (for mixing)
Masking tape & drop sheets
Plaster/Cement mortar must be fully cured (new plaster typically 28 days).
Surface must be structurally sound free of loose plaster, flaking paint or chalk.
Surface moisture content should be low aim for < 12% (use a moisture meter).
Remove grease, salts (efflorescence), algae, mould treat salt/efflorescence areas first.
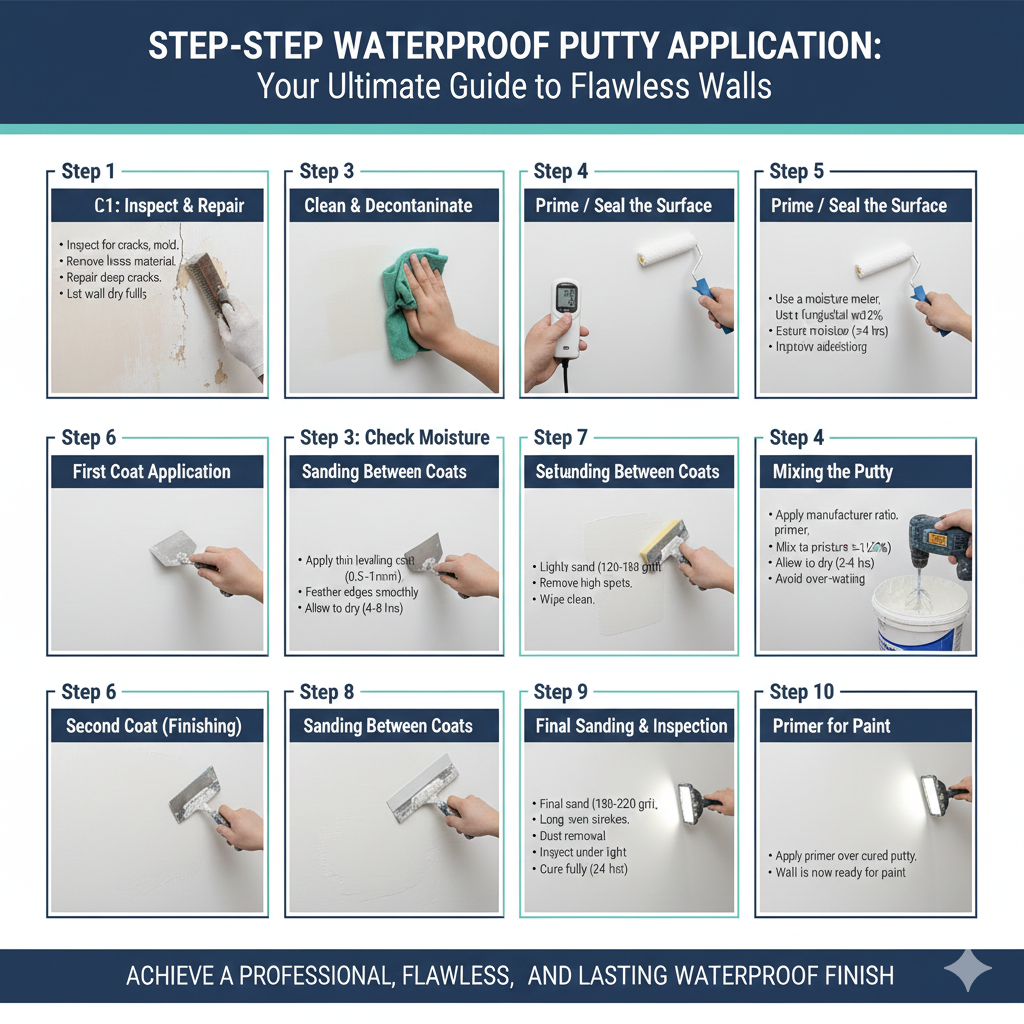
Step 1 — Inspect & Repair
Identify cracks, loose plaster, efflorescence, fungus.
Remove loose material with scraper or wire brush.
Repair deep cracks or holes with cement-based mortar (or appropriate filler) and allow to cure.
Step 2 — Clean & Decontaminate
Wash walls if dusty; for mould/fungus use a fungicidal wash.
Rinse and let the wall dry fully.
For efflorescence, remove salts mechanically and neutralize per chemical instructions.
Step 3 — Check Moisture
Use a moisture meter. If moisture >12–15%: find source, fix leak, dehumidify, or delay work.
Never apply waterproof putty to a damp wall.
Step 4 — Prime / Seal the Surface
Apply an alkali-resistant or acrylic primer/primer-sealer recommended for use with waterproof putty.
For porous new plaster: dilute primer (if recommended) to improve suction control.
Allow primer to dry as per product instructions (commonly 2–4 hours).
Why prime? Primer evens suction, improves putty adhesion, and reduces pinholes.
Step 5 — Mixing the Putty
Pre-mixed paste: Stir thoroughly with paddle mixer to a uniform, lump-free consistency.
Powder form: Follow manufacturer ratio on datasheet. If not available, mix to a thick, creamy paste (no lumps). Use measured water and add powder to water while stirring.
Mix only the amount you can use before initial setting — avoid re-tempering with extra water repeatedly.
Tip: Over-watering weakens bonding; under-mixing creates lumps.
Step 6 — First Coat Application (Scratch/Leveling Coat)
Apply the first thin leveling coat with a steel putty knife or trowel.
Recommended thickness: 0.5–1.0 mm per coat (avoid >2 mm in one go).
Work in smooth strokes; remove excess and feather edges.
Allow to firm up (touch dry) — typically 4–8 hours depending on humidity and temperature.
Step 7 — Sanding Between Coats
Lightly sand the first coat with 120–180 grit to remove high spots and get a uniform surface.
Wipe clean with a tack cloth.
Step 8 — Second Coat (Finishing Coat)
Apply a second thin finishing coat (0.5–1.0 mm).
Use a clean trowel and long, even strokes for a premium smooth finish.
Let it cure until fully dry — typically 24 hours in normal conditions; longer in high humidity.
For premium finishes: a third ultra-thin skim coat may be applied and sanded for glass-smooth surfaces.
Step 9 — Final Sanding & Inspection
Sand using 180–220 grit for final smoothness.
Remove dust with a damp sponge or tack cloth.
Inspect under directional light for pinholes or imperfections; touch up as needed.
Step 10 — Primer for Paint
Apply the recommended primer (alkali-resistant/acrylic) over the cured putty before painting.
Allow primer to dry completely, then proceed to paint (usually after 2–4 hours; follow product instructions).
Touch dry: 4–8 hours (varies)
Recoat readiness: 6–24 hours depending on humidity/temperature
Full cure: 7–14 days for full mechanical strength; paint adhesion is usually adequate after primer drying, but severe humidity delays cure.
Cold, humid conditions increase drying time — use fans, ventilation, or dehumidifiers if necessary.
| Problem | Likely Cause | Fix / Prevention |
|---|---|---|
| Putty peels after paint | High surface moisture or poor priming | Ensure moisture < 12%, apply primer; follow datasheet |
| Blistering / bubbles | Trapped moisture or fast drying over damp surface | Ensure dry substrate; avoid applying in direct sun or wind |
| Cracking | Over-thick single coat or incorrect mix | Apply thin coats; avoid > 2mm thickness in one coat |
| Powdery / weak surface | Over-diluted mix or low-quality product | Mix to recommended consistency; use high-quality putty |
| Uneven finish / trowel marks | Poor technique or dirty tools | Use clean tools; skilled applicator; sand lightly between coats |
With multiple brands in the market, not every “waterproof putty” truly delivers moisture resistance. Many low-quality products claim waterproofing but behave like regular putty once applied. To avoid premature wall damage and peeling paint, you must know how to verify whether the putty you’re buying is genuinely waterproof.
This section explains technical indicators, certifications, visual clues, and on-site checks to help you choose the right waterproof putty confidently.
A genuine waterproof putty will always have a detailed Technical Datasheet (TDS) issued by the manufacturer. The TDS outlines composition, application guidelines, performance metrics, and safety information. This is the most reliable way to verify whether the product truly offers waterproofing.
Waterproof putty contains high-performance polymers, which give it:
Superior bonding
Water repellency
Crack resistance
Typical polymer percentage for quality waterproof putty:
8–15% polymer content (depending on formulation)
If the TDS shows very low or zero polymer percentage, the product is not waterproof, regardless of marketing claims.
The water absorption rate is the strongest technical indicator of waterproofing.
Look for the parameters in the datasheet:
Water absorption < 10% (Excellent)
Water absorption 10–15% (Acceptable)
Water absorption > 20% (Not waterproof similar to regular putty)
Quality waterproof putty will clearly mention:
Low water absorption
Hydrophobic performance
Moisture barrier properties
If these values are missing, unclear, or unusually high → avoid the product.
Reputable putty brands undergo laboratory testing and certification to prove waterproofing performance. Always check whether the product meets or is tested against recognized standards.
Look for BIS (Bureau of Indian Standards) compliance or reference to relevant standards such as:
IS 15477 (Wall Finishing Materials)
IS 9103 (Concrete Admixtures - Polymer Performance)
IS 2645 (Integral Waterproofing Compounds)
(Note: Putty may not be explicitly certified under these standards, but good brands test performance based on similar parameters.)
If the brand never mentions BIS testing → be cautious.
A genuine waterproof putty brand will provide:
Third-party lab test reports
Water penetration resistance test results
Anti-fungal test results
Adhesion strength test results
Humidity chamber test results
If the brand provides no lab testing information, it is likely selling a basic cement putty disguised as waterproof.
You can also detect genuine waterproof putty during usage. Quality waterproof putty behaves differently from regular cement-based putty.
Waterproof putty paste looks creamy, smooth, polymer-rich
Powder variants have a finer texture
No excessive chalkiness or sand-like feel
Slight sheen or smoothness due to polymer content
Low-quality putty looks overly powdery or dry.
During application, genuine waterproof putty shows:
Better glide on the trowel due to polymer content
Higher adhesion to the wall
Less shrinkage while drying
Higher coverage compared to regular putty
Even, smooth finish with fewer trowel marks
Regular putty feels:
Dry
Hard to spread
Chalky
Weak in bond strength
After drying, waterproof putty displays:
High hardness
Zero powdering on touch
No hairline cracks
Hydrophobic behavior when lightly splashed with water
(Water drops should bead instead of absorbing quickly.)
Yes, waterproof putty is better than regular putty because it provides superior moisture resistance, stronger adhesion, and long-term protection against dampness, cracks, and efflorescence. Regular putty only smoothens the wall surface, while waterproof putty creates a protective hydrophobic barrier, making it ideal for kitchens, bathrooms, and damp-prone areas.
Using regular putty in bathrooms is not recommended. It absorbs moisture and can lead to peeling paint, fungal growth, damp patches, and bubbling. For bathroom, balcony, or wash-area walls, always use waterproof putty because it is designed to resist humidity and moisture penetration.
For exterior walls, waterproof or exterior-grade polymer putty is the best option. It offers:
Stronger adhesion
UV resistance
Weatherproofing
Better crack resistance
Long-term durability
Regular interior putty cannot withstand rain, sunlight, and temperature changes.
Waterproof putty helps prevent dampness by forming a moisture-resistant layer on the wall. However, it cannot fix severe water leakage or structural seepage. It is ideal for reducing surface dampness and improving wall longevity when used along with proper waterproofing systems.
Yes, waterproof putty can be applied on old walls after proper surface preparation. The wall should be:
Clean
Free from loose material
Treated for existing dampness
Primed if necessary
Once prepared, waterproof putty provides a smoother, stronger, and moisture-resistant finish even on old or previously painted walls.
Yes, waterproof putty is more durable because it contains advanced polymers that enhance strength, flexibility, and water repellency. It resists cracks, flaking, chalking, and fungal growth much better than regular putty, increasing the life of both the wall and paint.
Waterproof Putty:
Contains high-performance polymers
Low water absorption
Moisture-resistant and hydrophobic
Suitable for interior + exterior walls
Prevents dampness, cracks, and fungus
Normal Putty:
Cement-based, high water absorption
Only provides surface smoothness
Not suitable for wet or exterior areas
Prone to peeling and damp patches
Choosing between waterproof putty and regular putty ultimately comes down to understanding your wall conditions, exposure to moisture, and long-term durability expectations. While regular putty works well for smoothening interior dry walls and budget-friendly repainting projects, it falls short in areas exposed to humidity, leaks, or weather changes. On the other hand, waterproof putty offers superior resistance to water absorption, prevents dampness, minimizes cracks, and keeps walls looking fresh for years.
At Lapifix, we help homeowners choose the right putty for long-lasting, crack-free walls. Whether you're renovating or building new, our expert guidance and premium products ensure your walls stay beautiful, protected, and future-ready.