
Wall finishing plays a crucial role in determining how your paint will look and last over time. One of the most important materials used in this process is wall putty. If you are new to construction or home renovation, you might be wondering what is wall putty and why it is so widely used before painting.
In simple terms, wall putty is a fine powder made from white cement, polymers, and minerals that is applied to walls to create a smooth and even surface. It acts as a base layer that prepares walls for painting and ensures better adhesion of paint.
The wall putty meaning goes beyond just surface finishing. It helps fill minor cracks, removes imperfections, and improves the durability of walls. Whether it is a new construction project or repainting an old home, using wall putty for walls has become a standard practice in modern construction.
Another important reason for using putty is that it enhances the final appearance of paint. Without it, walls may look uneven, rough, or patchy even after multiple coats of paint.
In this beginner-friendly guide, we will explore everything you need to know about wall putty uses, its benefits, types, and the correct wall putty application process to achieve a flawless finish.
Wall putty is a smooth, white powder mainly made from white cement, polymers, and fine minerals. When mixed with water, it forms a paste that is applied to walls before painting.
In simple words, the wall putty meaning is a material used to level the surface and create a smooth base for paint. It helps hide small cracks, dents, and uneven areas on walls.
Unlike plaster, which is used for basic wall construction, wall putty for walls is applied as a finishing layer to improve surface quality and appearance.
It is widely used in both interior and exterior surfaces to ensure better paint performance and long-lasting results.
Using wall putty for walls is essential to achieve a smooth and long-lasting paint finish. It acts as a base layer that prepares the surface before painting.
One of the key benefits of wall putty is that it improves paint adhesion. This means the paint sticks better to the wall, reducing chances of peeling or flaking over time.
It also helps create a smooth and uniform surface by filling minor cracks, dents, and uneven areas. Without putty, walls may look rough and patchy even after painting.
Another important advantage is that it increases the durability of paint. A properly prepared surface ensures that paint lasts longer and maintains its appearance.
Overall, wall putty benefits include enhancing the final look of walls, making them appear cleaner, brighter, and more professional.
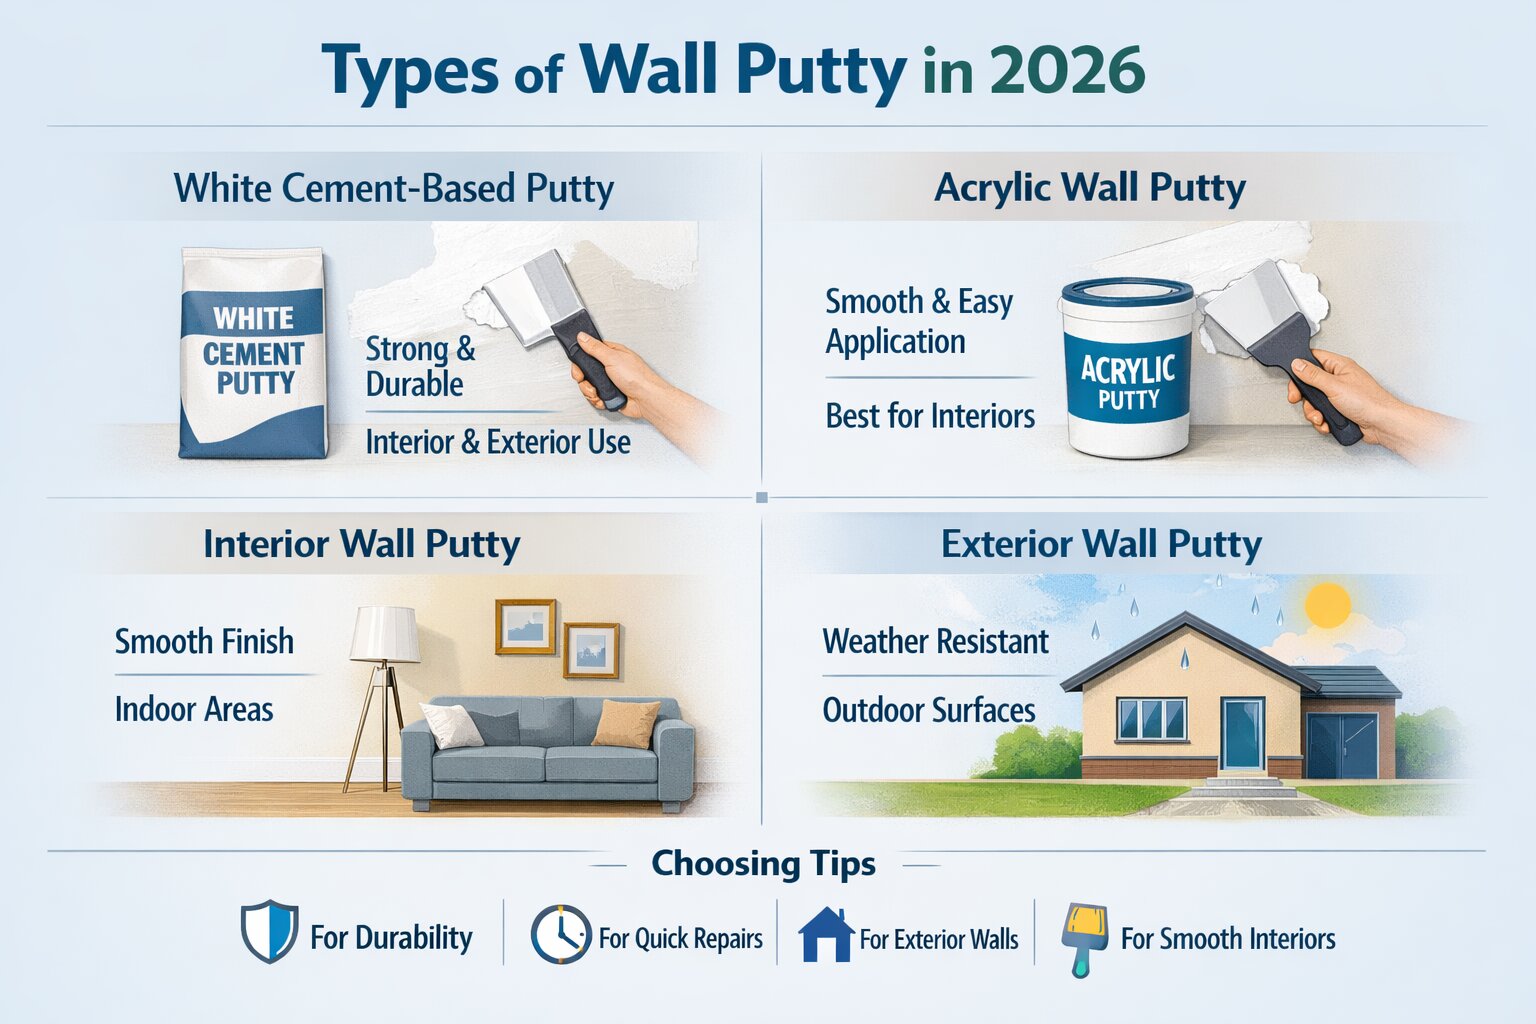
Choosing the right wall putty is important because different surfaces and conditions require different types. In 2026, wall putty is mainly available in two major categories, along with variations for interior and exterior use.
This is the most commonly used type of wall putty for walls. It is made from white cement, minerals, and polymers, which provide strong bonding and durability.
Key Features:
High strength and long-lasting finish
Excellent adhesion with cement surfaces
Water-resistant properties
Suitable for both interior and exterior walls
Best Use Cases:
New construction walls
Exterior surfaces exposed to moisture
Areas where durability is a priority
Acrylic putty is a ready-to-use, water-based product mainly used for interior applications. It is easy to apply and requires less preparation.
Key Features:
Smooth and creamy texture
Easy application process
Quick drying time
Ideal for repainting projects
Best Use Cases:
Interior walls
Touch-up or renovation work
Low-moisture areas
Wall putty for interior walls is designed to provide a smooth and polished finish inside homes and offices.
Characteristics:
Focus on smoothness and aesthetics
Less exposure to harsh weather
Works well with decorative paints
Ideal For:
Living rooms, bedrooms, ceilings
Decorative wall finishes
Wall putty for exterior walls is specially formulated to handle harsh environmental conditions like rain, humidity, and temperature changes.
Characteristics:
High water resistance
Strong bonding strength
Weather durability
Ideal For:
Building exteriors
Boundary walls
Areas exposed to moisture
Selecting the right wall putty depends on your wall condition and project type:
For long-term durability → choose white cement-based putty
For quick interior work → go with acrylic putty
For damp or exterior walls → always use exterior-grade putty
For smooth decorative finish → interior putty works best
Understanding these types helps you make the right decision and ensures better performance during the wall putty application process.
Wall putty is more than just a finishing material it plays a key role in improving surface quality and paint performance. From new construction to renovation, its applications are wide and practical.
One of the primary wall putty uses is to level uneven wall surfaces. After plastering, walls often have minor undulations or rough patches.
Fills low spots and smoothens high points
Creates a uniform base for painting
Improves overall wall alignment and finish
This step ensures that the final paint looks clean and professional.
Walls naturally develop small cracks due to drying, temperature changes, or structural movement. Wall putty for walls is highly effective in filling these imperfections.
Covers hairline cracks and pores
Prevents cracks from showing through paint
Enhances wall strength and durability
It acts as a protective layer that maintains surface integrity over time.
Using wall putty before painting is essential for achieving a high-quality finish. It prepares the wall to properly absorb and hold paint.
Improves paint adhesion
Reduces paint consumption
Ensures even paint application
Without putty, paint may look patchy and may not last long.
For modern interiors, walls are expected to look flawless. Wall putty provides the perfect base for decorative paints and textures.
Supports premium finishes like emulsion and texture paints
Enhances brightness and color consistency
Creates a smooth canvas for design work
This is especially important in high-end residential and commercial spaces.
Wall putty is widely used across different types of construction projects.
In Residential Spaces:
Homes, apartments, villas
Interior walls and ceilings
Exterior walls exposed to weather
In Commercial Projects:
Offices and showrooms
Hotels, malls, and hospitals
Large-scale infrastructure projects
Its versatility makes it an essential material in both small and large construction works.
Overall, understanding these wall putty uses helps in achieving better finishing quality, longer paint life, and a more professional appearance in any project.
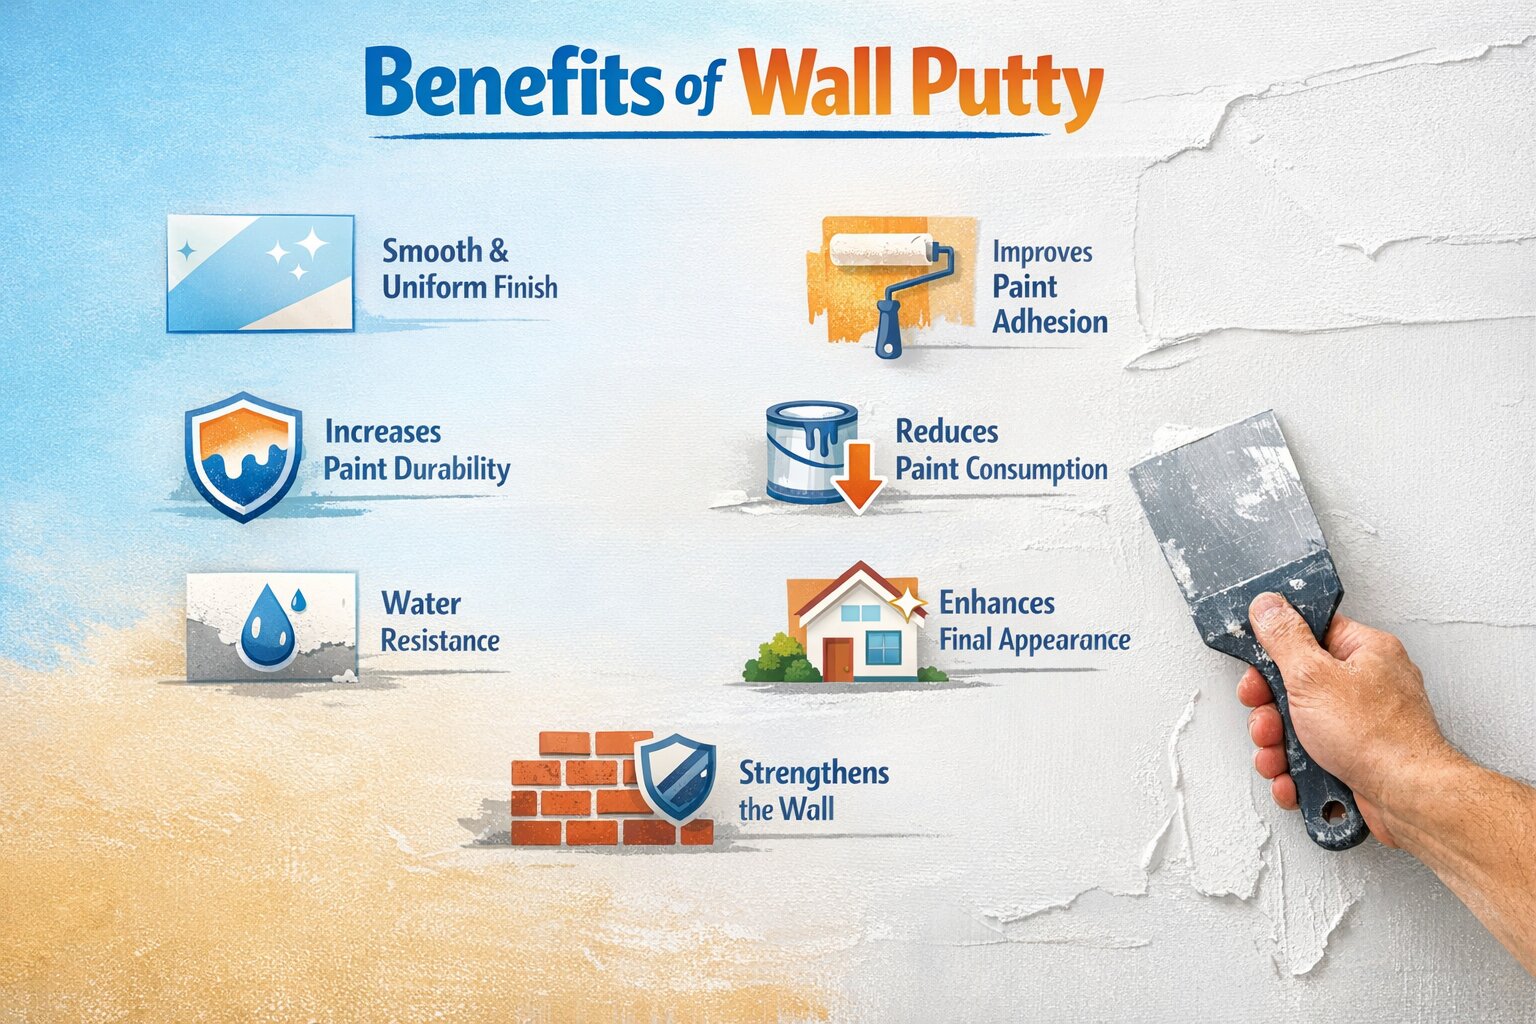
Using wall putty offers multiple advantages that go beyond just improving appearance. It plays a crucial role in enhancing the strength, finish, and life of your walls and paint.
One of the most noticeable wall putty benefits is the smooth surface it creates.
Eliminates roughness and uneven patches
Fills pores and fine imperfections
Gives walls a premium, polished look
This smooth base is essential for achieving a flawless paint finish.
Applying wall putty before painting helps paint stick better to the wall surface.
Reduces chances of peeling or flaking
Ensures even paint spread
Enhances paint performance
Better adhesion means your paint job stays intact for years.
A properly applied layer of wall putty for walls increases the lifespan of paint.
Protects paint from surface damage
Minimizes wear and tear
Maintains color quality over time
This reduces the need for frequent repainting.
Another practical advantage of wall putty uses is cost efficiency.
Requires fewer coats of paint
Improves paint coverage
Saves overall painting cost
A smooth base means less paint is absorbed by the wall.
High-quality wall putty (especially cement-based) provides resistance against moisture.
Helps prevent dampness
Protects walls from minor water exposure
Reduces chances of paint damage
This is especially useful in humid environments.
The final look of your wall depends heavily on surface preparation. Wall putty ensures:
Brighter and more even paint finish
Better reflection of light
Clean and professional appearance
It makes a significant difference in both interior and exterior aesthetics.
Apart from aesthetics, wall putty for walls also adds strength to the surface.
Improves bonding with the base plaster
Increases resistance to minor cracks
Enhances overall wall durability
In summary, these wall putty benefits make it an essential step in modern construction. It not only improves the look of your walls but also ensures long-term performance and cost savings.
Not all walls require the same type of wall putty. The requirements for indoor and outdoor surfaces are different, which is why choosing the right type is important for long-term performance.
Wall putty for interior walls is mainly used to enhance smoothness and visual appeal inside the building.
Key Features:
Provides ultra-smooth and polished finish
Ideal for decorative and premium paints
Works well in low-moisture environments
Best Used In:
Living rooms and bedrooms
Ceilings and hallways
Offices and interior commercial spaces
Interior putty focuses more on aesthetics and finish quality.
Wall putty for exterior walls is designed to handle harsh weather conditions like rain, heat, and humidity.
Key Features:
High water resistance
Strong bonding with cement surfaces
Durable under extreme weather
Best Used In:
Building exteriors
Boundary walls
Surfaces exposed to moisture and sunlight
Exterior putty is more about protection and durability.
Interior putty → Smooth finish & aesthetics
Exterior putty → Strength & weather resistance
Interior use → Low moisture areas
Exterior use → High exposure areas
The choice depends on where you are applying it:
For indoor walls → use wall putty for interior walls
For outside surfaces → choose wall putty for exterior walls
For best results → never interchange both types
Using the right wall putty for walls ensures better finish, durability, and long-term performance.
Applying wall putty before painting is one of the most important steps in achieving a smooth, durable, and professional finish. Skipping this step often leads to uneven surfaces, poor paint adhesion, and reduced paint life.
The primary role of wall putty before painting is to prepare the surface.
Fills pores, dents, and minor cracks
Levels uneven plastered surfaces
Creates a uniform base for further coating
Without this base, even high-quality paint cannot deliver a smooth finish.
A well-prepared surface directly affects how the final paint looks.
Ensures even paint spread
Prevents patchy or dull areas
Enhances color brightness and consistency
Using wall putty for walls helps achieve a premium, mirror-like finish, especially with modern paints.
Wall putty plays a key role between the plaster and primer layers.
Provides a stable surface for primer to bond
Reduces excessive absorption of primer
Improves overall coating efficiency
When the base is smooth, primer works more effectively and uniformly.
Paint adhesion is crucial for long-lasting results. Applying wall putty ensures:
Strong bonding between wall and paint
Reduced chances of peeling or flaking
Better resistance to wear and tear
This is especially important in high-traffic areas or exposed surfaces.
One of the biggest advantages of using wall putty before painting is durability.
Extends the life of paint
Protects walls from minor damage
Reduces maintenance and repainting costs
Walls treated with putty maintain their finish and strength for a longer time.
A smooth surface absorbs less paint, which means:
Fewer coats are required
Better coverage with less material
Cost savings on paint
This makes wall putty uses not only practical but also economical.
Proper use of wall putty for walls helps avoid common issues like:
Visible cracks after painting
Uneven texture
Early paint failure
It acts as a protective layer that ensures long-term surface stability.
In summary, applying wall putty before painting is not optional it is essential. It improves finish quality, strengthens paint performance, and ensures your walls remain smooth and attractive for years.
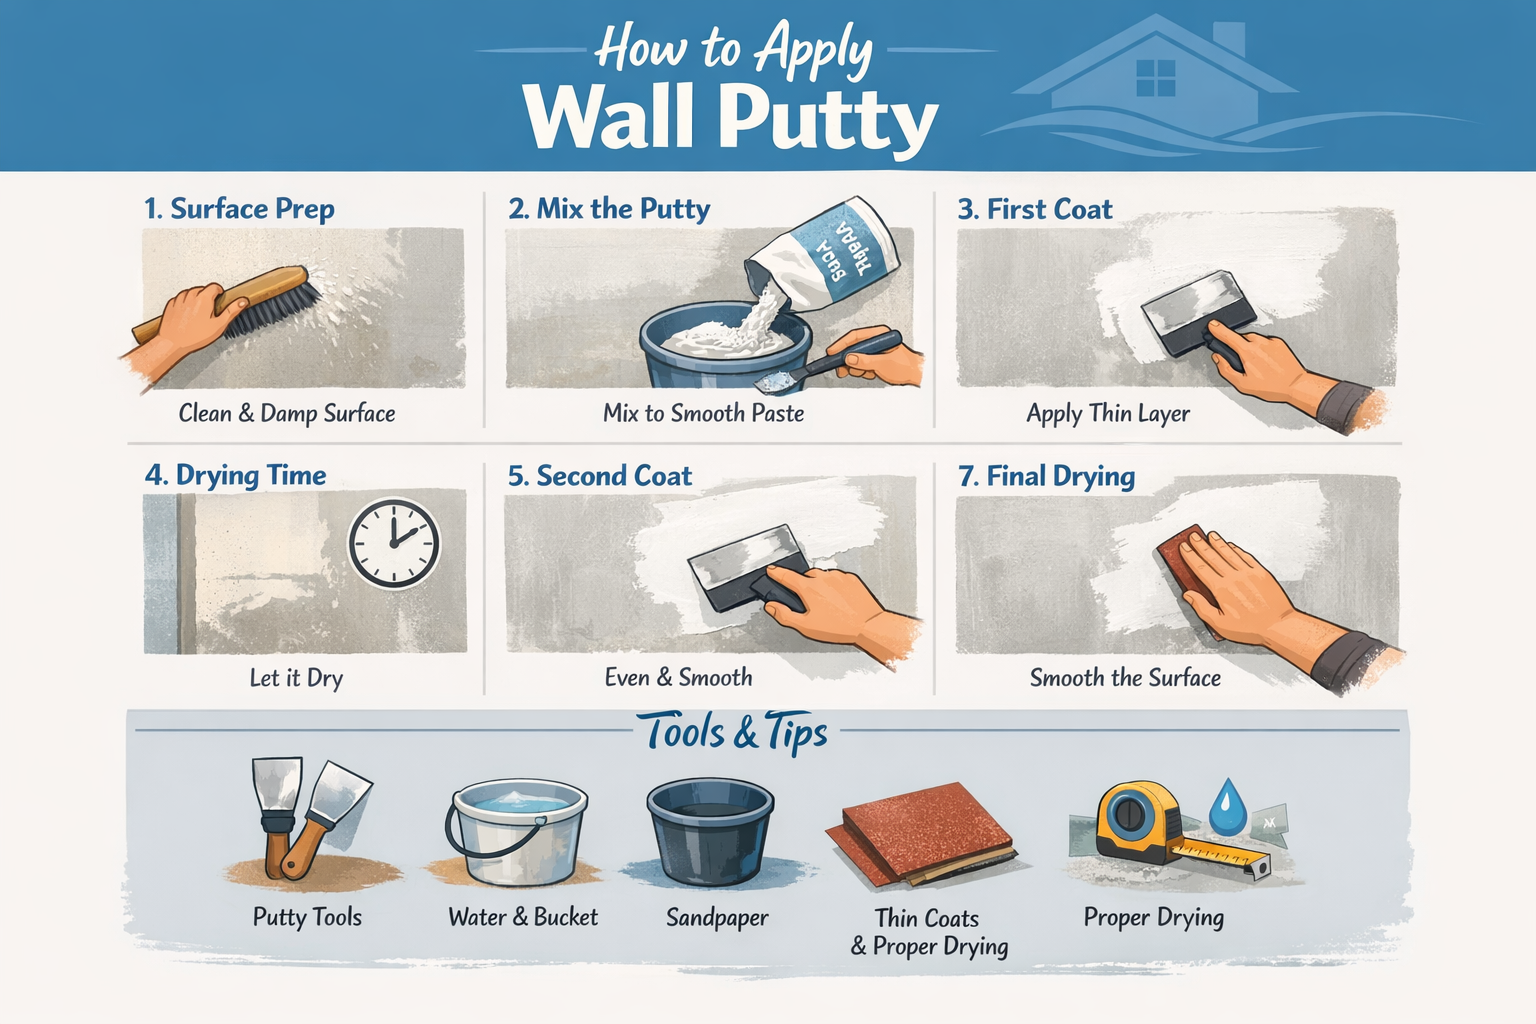
Applying wall putty correctly is essential to achieve a smooth and long-lasting finish. A proper method ensures better bonding, improved appearance, and maximum durability.
Before starting, the wall surface must be properly prepared.
Clean dust, grease, and loose particles
Remove old paint or flaking layers
Ensure the surface is slightly damp (not wet)
A clean surface helps wall putty for walls bond effectively.
Proper mixing is key to a smooth application.
Take required wall putty powder
Add clean water gradually (as per manufacturer ratio)
Mix until a smooth, lump-free paste is formed
Avoid over-mixing or making the paste too thin.
The first layer acts as the base coat.
Apply a thin layer using a putty blade or trowel
Spread evenly across the surface
Maintain consistent thickness
This coat helps fill minor cracks and surface imperfections.
Allow the first coat to dry completely.
Typical drying time: 4–6 hours (depending on conditions)
Avoid forced drying (like heaters or fans directly)
Proper drying ensures better bonding for the next layer.
The second coat improves smoothness and finish.
Apply another thin and even layer
Focus on achieving a uniform surface
Do not apply overly thick layers
This step is crucial in the wall putty application process.
Let the second coat dry completely.
Ensure no moisture remains
Check for any uneven spots
Good drying improves durability and finish quality.
Once dry, smooth the surface using sandpaper.
Light sanding for a flawless finish
Remove excess material and marks
Clean dust before applying primer
This final step prepares the wall for painting.
Putty blade / trowel
Mixing container
Sandpaper
Water and measuring tools
Always apply thin coats (not thick layers)
Follow proper drying time between coats
Use clean tools and water
Avoid application on very wet or very dry surfaces
By following this step-by-step guide on how to apply wall putty, you can achieve a smooth, durable, and professional-quality finish that enhances the overall look of your walls.
Understanding the complete wall putty application process helps ensure better results, fewer mistakes, and long-lasting performance. While the steps may seem simple, proper technique and timing make a big difference.
Before applying wall putty, inspect the wall condition carefully.
Check for cracks, dampness, or loose plaster
Clean dust, oil, and debris
Repair major damages before starting
A properly prepared surface is the foundation of a successful application.
The quality of the mix directly affects the finish.
Add water gradually to the putty powder
Maintain a consistent ratio as recommended
Mix until a smooth, lump-free paste is achieved
Improper mixing can lead to cracks or poor bonding.
The first coat acts as a leveling layer.
Apply evenly using a putty blade
Keep the layer thin and uniform
Cover all minor imperfections
This step ensures proper base formation for further coating.
Drying is a critical part of the wall putty application process.
Allow natural drying (avoid forced drying)
Maintain proper ventilation
Ensure complete drying before next coat
Incomplete drying can weaken the overall finish.
The second coat enhances surface quality.
Apply a finer and smoother layer
Focus on achieving uniformity
Avoid excessive thickness
This layer defines the final smoothness of wall putty for walls.
After drying, sanding is done to refine the surface.
Use fine sandpaper
Remove uneven spots and marks
Clean dust thoroughly
This step prepares the wall for primer and paint.
Before painting, inspect the wall again.
Ensure surface is smooth and even
Check for any visible defects
Make minor corrections if needed
Applying on dirty or damp surfaces
Using incorrect water ratio
Skipping drying time
Applying thick layers instead of thin coats
Following the correct wall putty application process ensures better adhesion, smoother finish, and longer-lasting paint performance.
Even the best quality wall putty may fail if it is applied incorrectly. Many issues like peeling paint, cracks, or uneven finish are usually caused by application mistakes rather than the material itself.
One of the most common errors is skipping proper surface cleaning.
Dust and grease reduce bonding strength
Leads to peeling or weak adhesion
Always clean the wall before applying wall putty for walls
Applying putty on damp walls can cause serious problems.
Leads to bubbling and flaking
Reduces durability of paint
Always ensure the surface is dry before application
Improper mixing affects the quality of application.
Too much water weakens bonding
Too little water makes it hard to apply
Follow recommended ratios for best results
Many beginners apply thick coats thinking it will give better results.
Causes cracks after drying
Increases drying time
Always apply thin, even layers in the wall putty application process
Drying time is critical for proper bonding.
Applying second coat too early weakens layers
Leads to uneven finish
Allow sufficient drying between coats
Sanding is essential for a smooth finish.
Uneven sanding creates visible marks
Over-sanding can damage the surface
Use fine sandpaper for best results
Skipping primer after wall putty before painting is a big mistake.
Reduces paint adhesion
Affects paint finish and durability
Always apply primer before final paint
Choosing incorrect putty can impact performance.
Interior putty on exterior walls → poor durability
Exterior putty indoors → unnecessary cost
Select the right wall putty for walls based on usage
Low-quality putty can lead to long-term issues.
Weak bonding
Reduced lifespan
Poor finish quality
Always choose trusted brands for better performance.
Avoiding these common mistakes ensures that your wall putty uses deliver the desired results smooth finish, strong bonding, and long-lasting paint.
Estimating the right quantity of wall putty is important for both cost control and proper planning. Using too little can lead to uneven coverage, while excess material increases wastage.
The coverage of wall putty for walls depends on surface condition and application method.
1 kg wall putty ≈ 1.5 to 2 sq ft (for 2 coats)
Smooth surfaces → higher coverage
Rough or uneven walls → lower coverage
This estimate may vary based on product quality and application thickness.
Several factors influence how much wall putty you will need:
Surface Condition
Rough walls require more material
Smooth plaster needs less putty
Number of Coats
Usually 2 coats are recommended
Additional coats increase consumption
Application Thickness
Thicker layers use more material
Thin, even coats are more efficient
Skill of Applicator
Experienced workers minimize wastage
Poor application can increase usage
To estimate quantity:
Measure total wall area (in sq ft)
Divide by average coverage (1.5–2 sq ft per kg)
Example:
Wall area = 1000 sq ft
Required putty ≈ 500–650 kg (approx.)
This gives a rough idea for planning your project.
Always add 5–10% extra for wastage
Check manufacturer guidelines for exact coverage
Consider wall condition before calculating
Plan material based on the wall putty application process
Using the right amount of wall putty before painting ensures:
Uniform surface finish
Better cost management
Reduced material wastage
Smooth workflow during application
In summary, understanding how much wall putty for walls is required helps you avoid delays, control costs, and achieve a professional-quality finish.
In simple terms, wall putty is an essential material for achieving smooth, durable, and high-quality wall finishes. From understanding what is wall putty to learning its application and benefits, it is clear that it plays a vital role in modern construction.
Using wall putty for walls not only improves paint adhesion but also enhances the overall appearance and lifespan of your walls. Whether you are working on a new project or repainting your home, proper surface preparation with putty ensures better and long-lasting results.
By choosing the right type and following the correct application process, you can achieve a professional finish with minimal issues. Investing in quality materials and proper techniques will always give you better value in the long run.
For best results, always go with trusted solutions like Lapifix wall putty to ensure strength, smoothness, and durability in every layer.
Here are some commonly searched questions about wall putty that help users better understand its usage and importance.
Wall putty is a white cement-based material applied to walls before painting. It is used to create a smooth surface, fill minor cracks, and improve paint adhesion for a better and longer-lasting finish.
Yes, applying wall putty before painting is highly recommended. It ensures a smooth base, reduces paint consumption, and improves the durability and appearance of the paint.
Technically yes, but it is not advisable. Without wall putty for walls, the surface may remain rough and uneven, leading to poor paint finish and reduced lifespan.
High-quality wall putty can last for many years if applied correctly. It enhances paint durability and protects the wall surface from minor damage and wear.
The best wall putty for walls depends on your needs:
For durability → white cement-based putty
For interior smooth finish → acrylic putty
For exterior use → weather-resistant putty
Generally, 2 coats of wall putty are sufficient for a smooth and even finish. Additional coats may be needed for highly uneven surfaces.