
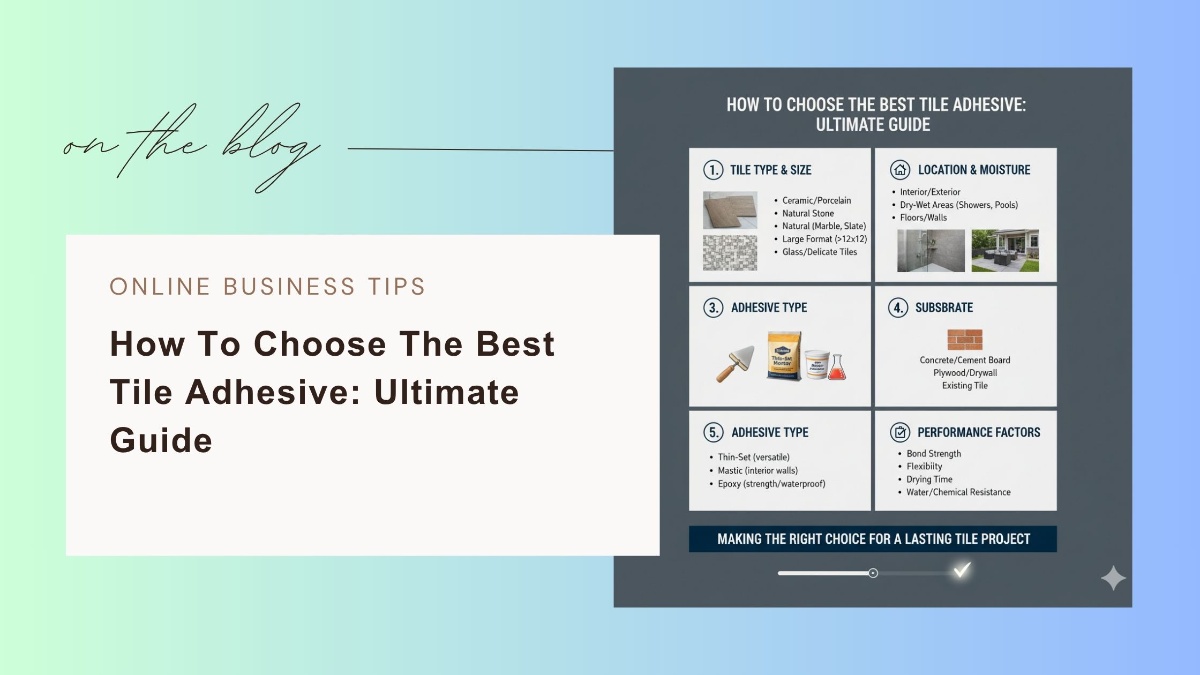
Embark on your tiling journey with our ultimate guide to tile adhesives, a comprehensive resource designed to empower you with the knowledge to choose the right tile adhesive for every project. Whether you're a seasoned professional or a DIY enthusiast, understanding the nuances of adhesive selection is crucial for achieving a durable and aesthetically pleasing result. This expert guide will navigate you through the diverse world of tile adhesives, ensuring your tile installation stands the test of time.
Selecting the correct tile adhesive is as vital as choosing the best tile for your space. Adhesive matters significantly, as it forms the crucial bond between the tile and the substrate. This bond, particularly in areas with old tiles, determines the longevity and durability of your tiling project, especially in regions prone to moisture or temperature changes. Modern tile adhesives are engineered to provide superior adhesion, flexibility, and resistance to environmental factors, ensuring a lasting and visually appealing finish.
Tile adhesive is a specially formulated mixture designed to fix tiles securely onto various surfaces like concrete, plaster, or old tiles. Unlike traditional cement and sand mortar, modern tile adhesives provide stronger bonding, flexibility, and water resistance.
They are available as ready-mix pastes or cementitious powders that just need water to activate. These adhesives also reduce tile slippage, enhance workability, and ensure uniform thickness giving your walls and floors a clean, durable finish.
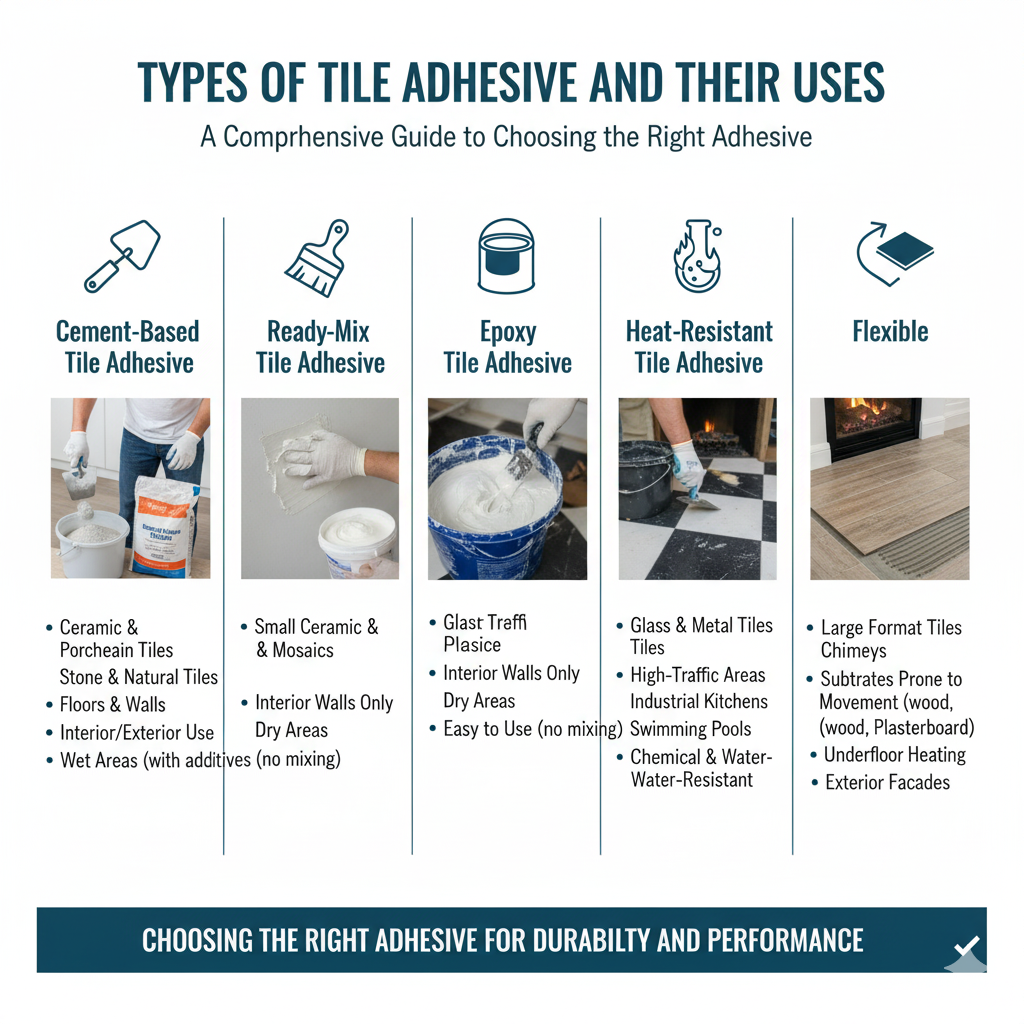
Selecting the correct type of tile adhesive is one of the most crucial steps in achieving a long-lasting and durable tile installation. With so many varieties available today from cement-based to epoxy and flexible adhesives understanding their characteristics, strengths, and best use cases helps you make an informed decision.
The right adhesive ensures strong bonding, prevents tile breakage, and keeps your flooring or wall finishes looking perfect for years. Below is a detailed breakdown of the most commonly used tile adhesives and where each performs best.
Cement-based tile adhesive is by far the most widely used and versatile option for both wall and floor tile installation. It is made of a blend of cement, polymers, and fine sand, designed to provide superior adhesion compared to traditional sand-cement mortar.
It is typically supplied in powder form and needs to be mixed with clean water or a latex additive before use. Once applied, it offers a strong mechanical bond between the tile and substrate.
Key Features & Benefits:
Excellent bond strength for ceramic, porcelain, and vitrified tiles.
High durability and flexibility, minimizing cracks and tile displacement.
Water-resistant, making it suitable for wet areas like bathrooms, kitchens, and balconies.
Reduces tile slippage and ensures a uniform layer thickness.
Easy to mix and apply using a notched trowel, this adhesive is ideal for both DIY enthusiasts and professionals.
Best Applications:
Indoor and outdoor floors.
Bathrooms, kitchens, and living rooms.
Suitable for ceramic, vitrified, and porcelain tiles.
Examples: Adhesive is ideal for achieving perfect tile alignment.
Cement-based adhesives are classified into performance categories such as C1 (standard) and C2 (improved) under ISO 13007 standards.
C1 adhesives are perfect for normal residential use.
C2 adhesives are enhanced with polymers, offering extra strength and flexibility ideal for large-format or heavy tiles.
Brands like Lapifix offer Polymer-modified cement adhesives that offer high-strength properties for better performance. with high tensile strength for residential and commercial spaces.
The ready-mix tile adhesive, also known as dispersion adhesive, is a pre-prepared paste that comes ready for direct application no water or mixing required. This makes it a favorite among DIY users and small renovation projects.
Key Features & Benefits:
Pre-mixed consistency ensures uniform bonding and easy application.
Perfect for vertical surfaces, as it minimizes tile slippage.
Offers strong adhesion for small ceramic or mosaic tiles.
Saves time since it eliminates the mixing process.
Limitations:
Not suitable for heavier tiles or when moisture resistance is a priority. Large-format tiles, outdoor areas, or high-moisture environments like swimming pools.
Slower drying time compared to cement-based adhesives can impact moisture resistance.
Best Applications:
Backsplashes, bathroom walls, and kitchen tiles.
Interior walls with small tile sizes (up to 30x30 cm).
Ideal for DIY and repair work where minimal setup is desired.
Pro Tip: When applying ready-mix adhesives, ensure the surface is clean and slightly rough for the paste to bond effectively. Avoid using it on floors or large porcelain tiles, as the bonding strength may not be sufficient for heavy loads.
When it comes to strength, durability, and water resistance, epoxy tile adhesive stands at the top. It’s a two-component system consisting of resin and hardener, which creates a chemical bond much stronger than cementitious adhesives.
Key Features & Benefits:
Unmatched bonding strength even under heavy loads.
100% waterproof and highly resistant to chemicals, acids, and oils.
Perfect for industrial and commercial spaces.
Provides excellent flexibility and can withstand thermal expansion and vibrations.
Easy to clean, making it ideal for hygienic areas like kitchens and hospitals.
Best Applications:
Commercial kitchens, swimming pools, laboratories, and factories.
Areas exposed to constant moisture, chemicals, or temperature changes.
Mosaic and glass tiles that require precision bonding.
Pro Tip: Epoxy adhesives set quickly, so work in small sections. Always mix both components in exact proportions to ensure full curing.
Example: Brands like Lapifix produce epoxy tile adhesives specifically for industrial-grade installations that require maximum durability.
For areas exposed to high temperatures such as fireplaces, chimneys, kitchen walls behind stoves, or barbecues a heat-resistant tile adhesive is the right choice. This adhesive is formulated to withstand thermal stress and temperature fluctuations without losing its bond strength.
Key Features & Benefits:
Can resist temperatures up to 250°C or higher.
Maintains bonding integrity even in continuous heat exposure.
Prevents tile cracking or detachment in hot environments.
Compatible with ceramic and quarry tiles commonly used around heat sources.
Best Applications:
Fireplace surrounds, stovetops, and baking ovens.
Outdoor kitchens and industrial heat zones.
Pro Tip: Always allow the adhesive to cure fully before heating the area. Incomplete curing can weaken the bond when exposed to high temperatures.
As modern architecture embraces larger tile formats and lighter materials, the demand for lightweight or flexible tile adhesives has grown. These adhesives are formulated with Polymer modification and can enhance the adhesive's performance, making it suitable for a variety of substrates. and lightweight fillers, providing better flexibility and reduced weight per square meter.
Key Features & Benefits:
Excellent for large-format tiles, porcelain slabs, and thin tiles.
Enhanced flexibility accommodates substrate movement or thermal expansion.
Low weight, improving coverage and reducing strain on vertical applications.
Easy to spread and work with, especially on gypsum boards or drywalls.
Offers high deformation capacity, making it suitable for vibration-prone areas.
Best Applications:
High-rise buildings, gypsum board walls, and renovation projects.
Balconies, terraces, and areas exposed to temperature changes.
Perfect for vitrified tiles, granite, and natural stone installations.
Example: Lapifix Flexible Tile Adhesive and Weber Flex are popular options that provide long-lasting adhesion for large-format and heavy tiles.
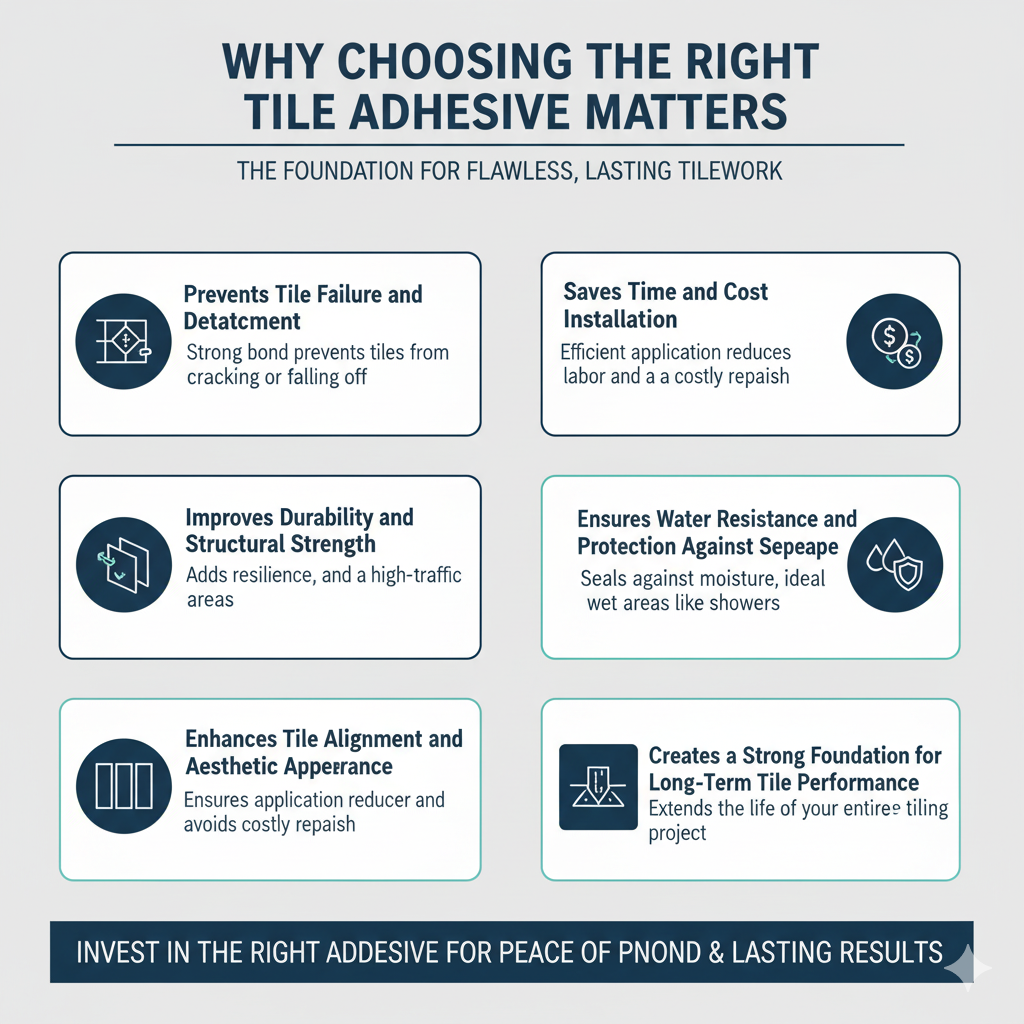
Many people invest in premium-quality tiles but overlook one critical element the tile adhesive. This hidden yet powerful layer is the true foundation of every tiling project. Choosing the wrong adhesive can result in tile popping, uneven surfaces, cracks, and water seepage issues that not only spoil the aesthetics but also lead to costly repairs in the long run.
Whether you’re fixing vitrified floor tiles in a living room, installing ceramic tiles in a bathroom, or applying porcelain tiles in an outdoor area, the type of adhesive you select determines how well your tiles perform under real-life conditions.
Here’s an in-depth look at why selecting the right tile adhesive truly matters for your project.
The primary function of tile adhesive is to ensure High-strength adhesives ensure strong and permanent bonding for various applications. between the tile and substrate. Poor adhesion often leads to tile popping, hollow sounds, or even complete detachment over time.
Using the wrong adhesive such as a standard cement mix for vitrified or porcelain tiles may not provide sufficient grip, leading to failure under foot traffic or weight pressure.
Modern polymer-modified tile adhesives, like those from Lapifix, create a chemical bond that holds tiles securely even on low-porosity surfaces such as vitrified or granite. These adhesives form a thin yet powerful layer that evenly distributes weight and stress across the surface, minimizing weak points.
Pro Tip: Always choose a C2 or polymer-modified adhesive for large-format, vitrified, or heavy tiles it ensures superior bond strength and long-term stability.
Tiles are subjected to continuous thermal expansion, vibration, and structural movement, especially in large or multi-story buildings. If your adhesive cannot accommodate these stresses, cracks and tile displacement are inevitable.
A flexible tile adhesive compensates for minor substrate movement, preventing breakage and debonding. For example, polymer-based adhesives are designed to expand and contract slightly with temperature changes, maintaining tile integrity in both indoor and outdoor conditions.
In comparison, traditional cement and sand mortar lacks elasticity, causing brittle joints that fail under stress.
Using high-quality adhesives like Lapifix Flexible Tile Adhesive ensures not only strength but also resilience against micro-movements, vibrations, and environmental fluctuations ultimately enhancing the lifespan of your flooring and walls.
Even the best tiles can look unprofessional if the surface is uneven. The right tile adhesive ensures Perfect tile alignment is essential for ensuring that tiles remain intact over time., resulting in a flat, seamless, and visually appealing finish.
Unlike thick layers of traditional mortar, which are prone to unevenness, tile adhesive is applied in a A thin layer (3–5 mm) is often suitable for substrates that require even adhesion. using a notched trowel. This creates a consistent surface that keeps each tile perfectly level and aligned.
Furthermore, adhesives have a longer open time meaning you can adjust tile positions before the adhesive sets ensuring precision without rushing.
Pro Tip: Always use the appropriate trowel size for the tile dimension. For example, large-format tiles require deeper notches to ensure full coverage underneath.
Enhanced Visual Impact:
Keeps grout joints consistent.
Avoids visible lippage (uneven edges).
Results in a premium, professional look that enhances the overall interior design.
A well-leveled and properly bonded tile surface not only looks elegant but also adds long-term value to your property.
Using the right tile fixing solution significantly reduces installation time and overall project costs.
Traditional cement and sand mixtures require labor-intensive preparation, uneven application, and longer drying periods. In contrast, tile adhesives are ready-to-mix formulations that deliver better coverage, faster setting, and stronger bonding saving you both time and money.
Here’s how:
Quick Application: Adhesives spread evenly and require less effort.
Reduced Material Waste: Their thin-layer technology ensures more coverage per bag.
Lower Labor Costs: Faster installation means less man-hours.
Less Maintenance: Fewer cracks and rework costs in the long term.
For large projects, such as commercial flooring or large residential developments, using professional-grade adhesives like Lapifix Polymer-Modified Tile Adhesive can improve efficiency by up to 30–40%This is particularly important when comparing to conventional cement mortar methods that lack moisture resistance.
Example: A 20 kg bag of tile adhesive covers approximately 4–5 m², whereas the same area with cement mortar would require more material and double the application time.
One of the most critical benefits of high-quality tile adhesive is its excellent waterproofing ability. In moisture-prone areas like bathrooms, the right adhesive is ideal for preventing mold and mildew. bathrooms, kitchens, balconies, and terraces, ordinary cement can absorb water, leading to mold growth, dampness, and efflorescence (white salt deposits).
Waterproof tile adhesives form a dense, non-porous layer between the tile and substrate, preventing water penetration and safeguarding the structure underneath.
This property is especially essential for:
Bathrooms and shower areas, where tiles are constantly exposed to moisture.
Outdoor balconies and terraces, which face rain and humidity.
Swimming pools or spa areas require specialized adhesives to handle exposure to water effectively., where waterproof epoxy adhesives are preferred.
Pro Tip: For wet areas, always choose waterproof or epoxy tile adhesives, such as Lapifix Waterproof Tile Adhesive, which resists water absorption and enhances longevity.
By ensuring superior water resistance, the right adhesive not only prevents leaks and mold but also maintains the strength and appearance of your tiles for years.
In any tiling project, the adhesive functions as the backbone, ensuring that tiles expand and contract without damage. structural foundation that determines the long-term success of the installation. A weak or inappropriate adhesive may not show problems immediately, but within months, you might notice cracks, loose tiles, or discoloration caused by moisture infiltration.
A good adhesive ensures:
Uniform weight distribution across all tiles.
Consistent bonding over the entire surface.
Resistance to weather and temperature changes.
Long-lasting durability with minimal maintenance.
Professional tile installers often refer to adhesive quality as the “invisible strength” of any tile job it’s unseen once tiles are laid, but it’s the single most important factor in ensuring longevity and beauty.
Selecting the best adhesive depends on the type of tile, substrate, and area of application. Here’s a breakdown:
| Application Area | Recommended Adhesive Type | Tile Type | Key Features |
|---|---|---|---|
| Bathroom & Kitchen Walls | Waterproof cement-based | Ceramic / Glazed Tiles | Water-resistant, anti-slippage |
| Living Room Floors | Standard cement-based | Porcelain / Vitrified Tiles | High bonding strength |
| Outdoor Areas | Flexible / Polymer-modified | Natural stone / Granite | Weather-resistant, flexible |
| Swimming Pools | Epoxy-based | Mosaic / Glass Tiles | 100% waterproof and chemical-resistant |
| Old Tiles Over Tiles | High-bond cementitious | Porcelain / Ceramic | Excellent adhesion over glazed surfaces |
| Fireplace / Hot Areas | Heat-resistant | Ceramic | Thermal stability |
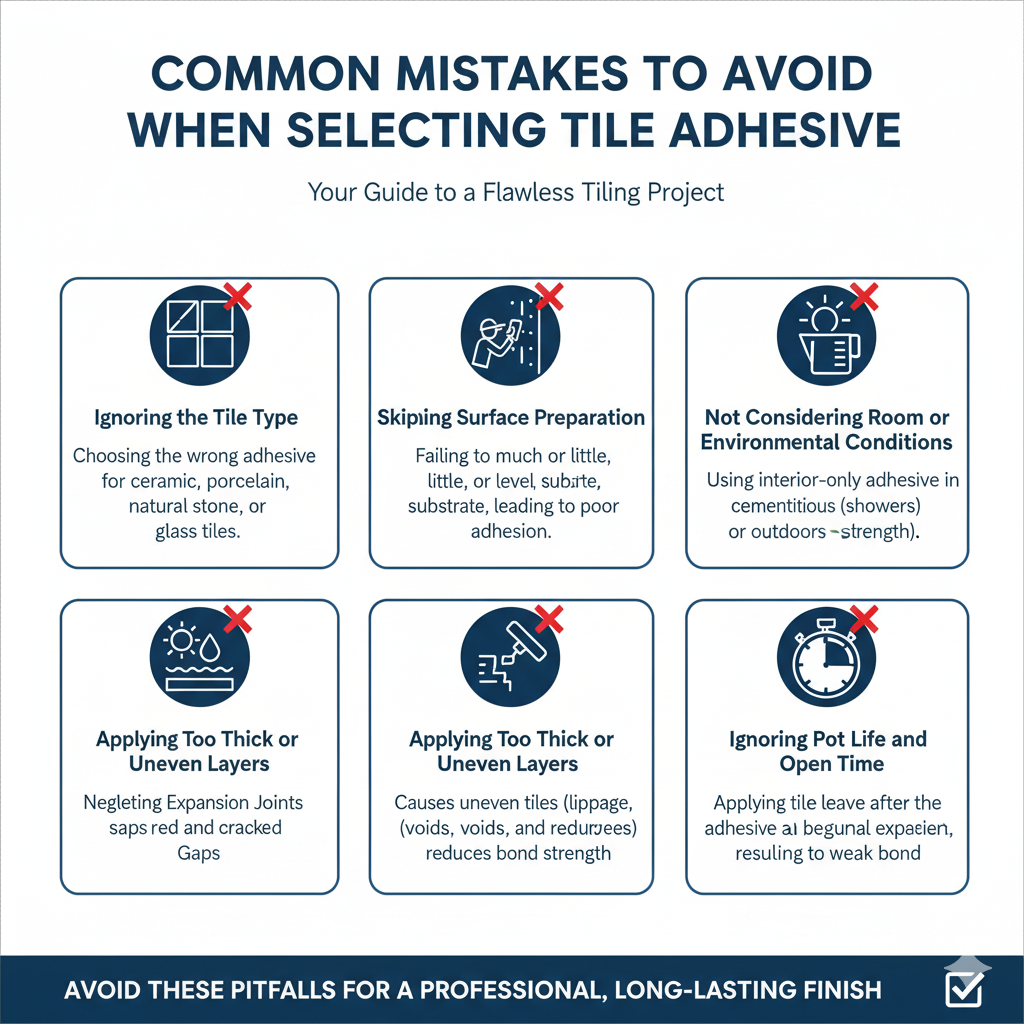
Even the best tile adhesive Adhesive can fail to perform if it’s not chosen, mixed, or applied correctly, especially with heavier tiles. Tile installation requires precision, and a single mistake can result in cracked tiles, hollow sounds, or complete debonding. To ensure a long-lasting and professional finish, avoid these common mistakes that both beginners and even experienced installers sometimes make.
One of the most frequent errors is using the wrong adhesive for the tile type.
Each tile material ceramic, vitrified, porcelain, or natural stone has different density and absorption characteristics.
For instance:
Ceramic tiles can work well with C1 cement-based adhesives, which provide adequate bonding strength.
Vitrified or porcelain tiles, on the other hand, are denser and require a C2 polymer-modified adhesive for proper adhesion.
Large-format tiles or thin tiles demand flexible adhesives that can absorb structural movement without cracking.
Using wall adhesive for heavy floor tiles or dense porcelain can result in sticking tiles that do not adhere properly. tile popping, uneven bonding, or complete detachment over time.
A perfectly mixed adhesive won’t bond if the surface isn’t prepared properly.
Many tile failures occur because of dust, grease, oil, or loose debris on the substrate. Before applying adhesive, ensure the surface is suitable for substrates and clean.
Clean, dry, and level
Free from old paint, oil, or laitance
Cured properly (especially for new concrete surfaces)
A clean surface ensures maximum contact area and strong adhesion. Skipping this step can lead to weak spots, hollow sounds, or tiles lifting within months of installation.
Tile adhesive consistency matters more than most people think, especially when considering factors to consider when selecting the right adhesive.
Too much water makes the adhesive runny and weak, reducing its holding capacity, while too little water makes it dry and unworkable.
Manufacturers provide exact mixing ratios (typically around 4.5–5 liters of water per 20 kg bag for cement-based adhesives). Always follow the label instructions.
Mix small batches and stir mechanically using a paddle mixer to achieve a smooth, lump-free paste. Let the adhesive stand for 5 minutes, then remix before application this activates the polymers for better performance.
Avoid hand mixing it often leads to inconsistent strength and bonding.
Environmental conditions significantly affect how tile adhesive cures and performs. Using indoor adhesive for outdoor areas or wet zones is a costly mistake.
Here’s what to remember:
Outdoor areas (terraces, balconies) → need weatherproof or flexible adhesives that can resist temperature changes and rain exposure.
Bathrooms, kitchens, and pools → require Waterproof tile adhesives are available on the market and are crucial for moisture-prone areas., such as epoxy or polymer-modified types.
High-temperature zones (like fireplaces or behind stoves) → demand heat-resistant adhesives that don’t degrade under heat.
Neglecting these factors can result in tiles loosening, cracking, or discolouring prematurely.
Many installers believe a thicker adhesive layer gives a stronger hold but this is a myth.
Tile adhesive is designed to be applied in a thin, uniform layer (3–6 mm). Thick layers cause:
Uneven leveling
Longer drying time
Reduced bonding strength
Increased shrinkage during curing
Use a notched trowel to spread adhesive evenly and create grooves for better grip. Press tiles firmly and slide slightly to achieve full coverage. For large-format tiles, back-buttering (applying adhesive on the back of the tile) ensures complete contact and stronger bonding.
Every adhesive has a specific pot life (time after mixing during which it remains usable) and open time (time after spreading before it loses tackiness).
If you exceed these, the adhesive loses its bonding properties, resulting in tiles that fail to adhere properly.
For example:
Cement-based adhesives usually have a pot life of 2–3 hours.
Open time is around 20–30 minutes, depending on room temperature and humidity.
Avoid applying adhesive over large areas at once to ensure proper adhesion and moisture resistance. Instead, work in small sections to maintain bonding effectiveness.
Tiles naturally expand and contract due to thermal changes. If you don’t leave expansion joints (every 3–4 meters) or movement gaps around walls, tiles may buckle, pop, or crack under pressure.
Use flexible tile adhesives and grouts in such areas they allow slight movement without affecting adhesion.
Always check the manufacturer’s recommendations for tile size, surface type, and environmental exposure before choosing or applying any adhesive. Brands like Lapifix, for instance, provide specialized formulations for different conditions from waterproof tile adhesive for bathrooms to flexible adhesive for large-format vitrified tiles.
Before beginning any tile installation, preparing the substrate is of paramount importance To ensure the longevity and durability of the entire tiling project, it's critical to choose an adhesive that suits a variety of substrates. The substrate must be clean, level, and structurally sound to provide a suitable surface for the tile adhesive to bond effectively. Remove any debris, dirt, or existing adhesive residue using appropriate cleaning methods. Repair any cracks or imperfections in the floor to create a smooth, even surface. Proper substrate preparation is an essential step in ensuring that your chosen right tile adhesive can create a strong and lasting bond, leading to a successful tile installation whether using ceramic and porcelain tiles or natural stone.
The application of tile adhesive is a critical step in any successful tile installation, requiring precision and adherence to manufacturer guidelines. Use the notched trowel specified for the type of tile and adhesive to spread an even layer of the tile adhesive onto the prepared substrate. The correct angle and pressure are essential to create consistent ridges that will ensure full coverage and a strong bond. For large-format tiles, back-buttering may be necessary to improve adhesion. Work in small sections to prevent the adhesive from drying out before setting the tile. The best tile adhesive applied correctly guarantees a strong bond between the tile and the substrate, crucial for the durability of the tiling project and avoiding issues like cracking or lifting.
Setting the tiles is a crucial step in the tile installation process, requiring careful alignment and consistent spacing to achieve a professional-looking result. Gently press each tile into the adhesive, using a slight twisting motion to ensure full contact with the adhesive bed. Use tile spacers to maintain consistent grout lines, which not only enhance the aesthetic appeal but also provide room for movement and prevent cracking. Periodically check the level and alignment of the tiles using a spirit level and make necessary adjustments before the tile adhesive sets. This meticulous process ensures a durable, aesthetically pleasing, and long-lasting tile installation, showcasing the quality of both the tile and the right tile adhesive used.
When aiming for a tiling project with unparalleled longevity, selecting the right tile adhesive is paramount. Modern tile adhesives are designed to provide exceptional durability, ensuring that your tile installation withstands the test of time. Polymer-modified adhesives, cement-based adhesives, and epoxy adhesives represent some of the best tile adhesive choices for projects where longevity is a key consideration. The type of tile, the nature of the substrate, and the environmental conditions are vital in determining the optimal tile adhesive for achieving a durable and long-lasting finish. The best tile fixing guarantees the longevity of your tiling project, preventing premature failures and maintaining the aesthetic appeal of your floor or wall, especially in areas like balconies.
Understanding the adhesive strength of different types of tile adhesives is essential for ensuring the durability of any tiling project. Manufacturers typically provide technical data sheets that detail the bond strength of their products, often measured in pounds per square inch (PSI), which is crucial for understanding the range of tile adhesives available. This testing process evaluates the right tile adhesive’s capacity to withstand tensile and shear forces, simulating real-world stresses. Factors like temperature changes and moisture can significantly impact the right tile adhesive’s performance, so selecting the right adhesive that has undergone rigorous testing is crucial. The ultimate guide to tile adhesives emphasizes the importance of scrutinizing adhesive specifications to choose the right tile adhesive for optimal strength and performance.
Maintaining the integrity of both tile and tile adhesive is crucial for extending the life of your tiling project, especially in wet areas like the bathroom or swimming pools. Regularly clean the tile surface with a pH-neutral cleaner to prevent the build-up of dirt and grime, which can compromise the adhesive bond over time. Inspect grout lines for cracks or damage, as these can allow moisture to penetrate and undermine the adhesive. For high-traffic areas, consider applying a sealant to protect the tile and grout from wear and tear. Addressing minor issues promptly can prevent more significant problems and maintain the performance and appearance of your tile installation.
Selecting the right tile adhesive is a multifaceted decision, dependent on several key factors, as highlighted throughout this ultimate guide to tile adhesives. The type of tile whether ceramic and porcelain tiles, natural stone, or glass dictates the adhesive requirements, as does the nature of the substrate. Cement-based adhesives may suffice for some applications, while polymer-modified or epoxy adhesives are better suited for others. Environmental conditions, such as temperature changes and moisture levels, also play a crucial role in the selection process. By carefully considering these elements, you can ensure a durable and long-lasting tile installation, avoiding common pitfalls associated with incompatible adhesive choices.
Each type of tile adhesive serves a specific purpose from cement-based adhesives for everyday use to epoxy and flexible adhesives for specialized installations. Understanding these differences helps you learn how to choose the right product and achieve professional-grade tiling that lasts for decades.
If you’re looking for high-performance options, Lapifix Tile Adhesive offers a complete range of polymer-modified, waterproof, flexible, and epoxy adhesives tailored to modern construction needs. Whether you’re fixing tiles in a bathroom, outdoor patio, or commercial kitchen, Lapifix ensures that even existing tiles adhere securely. perfect bonding, superior finish, and long-term durability.
Beyond selecting the right tile adhesive, meticulous surface preparation, precise adhesive application, and careful tile setting are vital for a successful tile installation. Ensure the substrate is clean, level, and structurally sound before applying the tile adhesive. Use the correct notched trowel to create an even adhesive bed, promoting full tile coverage. Employ tile spacers to maintain consistent grout lines and allow for expansion and contraction. Regularly check the level and alignment of tiles as you work. Taking these steps will help you achieve a professional-looking and durable tile installation that will stand the test of time and will protect the tile and the adhesive used.
To further expand your knowledge of tile adhesives and tile installation techniques, explore resources such as industry publications, technical data sheets from adhesive manufacturers, and online forums dedicated to tiling professionals and DIY enthusiasts. Consult with experienced tile installers or suppliers for personalized advice and guidance specific to your project requirements. Participating in workshops or training courses can provide hands-on experience and valuable insights into best practices for tile installation. By continuously seeking knowledge and refining your skills, you can ensure the success of your future tiling projects and make informed decisions about the types of tile adhesives best suited for your needs.
A waterproof cement-based adhesive with anti-slippage properties works best for bathrooms, particularly in areas with frequent temperature changes.
Waterproof adhesives resist moisture and prevent seepage, ideal for wet areas like bathrooms and kitchens.
Yes, provided you use a high-bond cementitious adhesive and clean the surface properly.
Usually 24 hours for light traffic, but epoxy-based types may take longer.
Epoxy adhesives are the strongest and most durable, ideal for industrial or high-traffic areas.
Yes, use flexible or polymer-modified adhesives that can withstand temperature changes and rain.
Absolutely. Tile adhesive offers better bonding, water resistance, and smoother finishes than traditional cement.
Typically 3–5 kg per m², depending on tile size and surface condition.
It’s recommended to remove paint and roughen the surface for better bonding.
Yes, grout fills the gaps between tiles and provides a finished, water-resistant surface.