

Choosing the right tile adhesive is only part of a successful tiling project. The amount applied beneath each tile also matters because it influences adhesive contact, tile support, finished levels and installation quality. Understanding tile adhesive thickness helps installers avoid insufficient coverage, excessive adhesive build-up and problems caused by uneven substrates.
However, there is no single thickness suitable for every tile installation. The correct application depends on the adhesive formulation, the tile's dimensions and back profile, the substrate condition, the installation method and the manufacturer's specified application limits.
It is also important to distinguish the adhesive ridges created by a notched trowel from the final adhesive bed after a tile has been pressed into place. These are not the same measurements.
This guide explains how to determine an appropriate adhesive bed, what affects the finished thickness, how wall and floor applications differ, and how to check whether tiles have adequate support.
The correct tile adhesive thickness depends on the product being used and the conditions of the installation. Some adhesives are designed for conventional thin-bed applications, while others permit different application depths when used according to their technical documentation.
Before installation, check the adhesive manufacturer's technical data sheet for its permitted application range, substrate requirements, compatible tile types and application method. Do not assume that a product suitable for standard ceramic tiles can also be applied in a substantially thicker layer beneath heavy porcelain tiles.
The tile manufacturer's instructions should also be considered, particularly for large-format products and natural stone. If the tile, substrate or installation method falls outside the adhesive's stated limitations, select a suitable system rather than improvising.
The objective is not to create the thickest possible layer. It is to establish consistent contact between the tile and substrate while keeping the adhesive within its specified application limits.
For a practical installation, tile adhesive thickness should therefore be determined from the product documentation and verified through appropriate application and coverage checks.
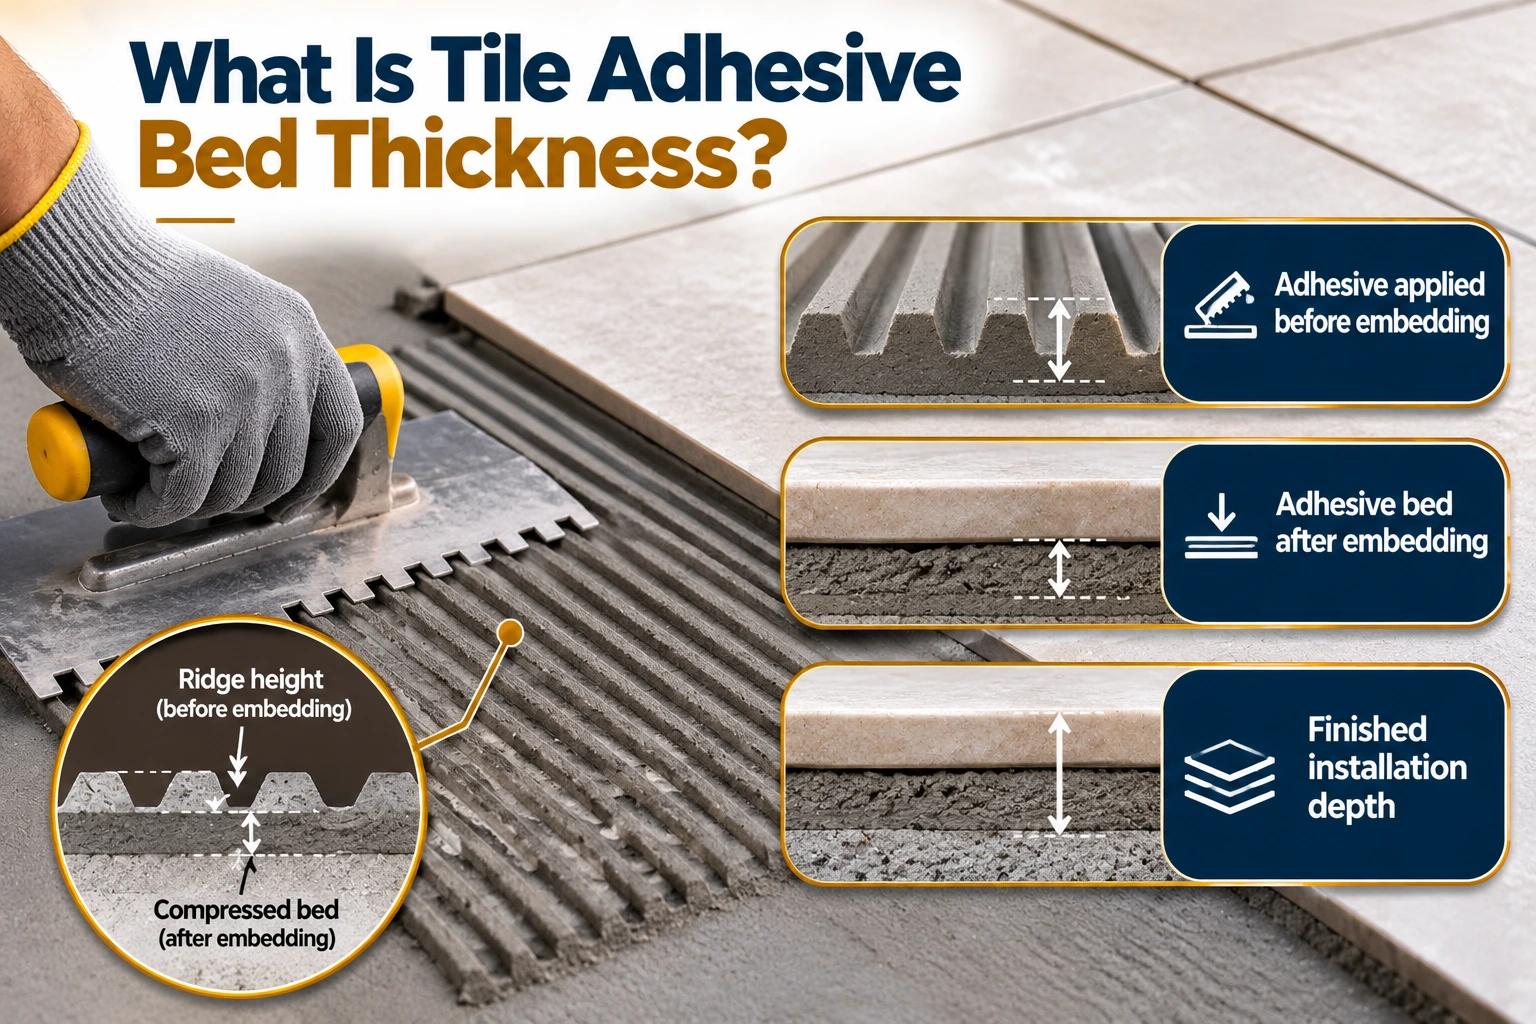
Three related measurements are important when discussing adhesive application: the height of the adhesive ridges before embedding, the compressed adhesive bed beneath the tile, and the overall finished installation depth.
When a notched trowel passes through adhesive, it creates ridges separated by channels. The height of these ridges depends on the notch geometry, the angle at which the trowel is held and the consistency of the adhesive.
The ridge height is not necessarily the thickness of the finished adhesive layer. Space between the ridges remains until the tile is embedded.
When the tile is placed and moved using the recommended technique, the adhesive ridges flatten and spread. The resulting layer depends on the amount of adhesive applied, how completely the ridges collapse, and the geometry of the tile and substrate.
This compressed layer is the actual adhesive bed. It should provide the contact and support required by the installation system.
The finished depth also includes the tile itself and the geometry of the underlying substrate. A thicker tile, a recessed tile back or a change in substrate level can affect the final position of the tile.
These measurements should not be treated as interchangeable. A trowel notch marked with a particular dimension does not guarantee an adhesive bed of the same thickness.
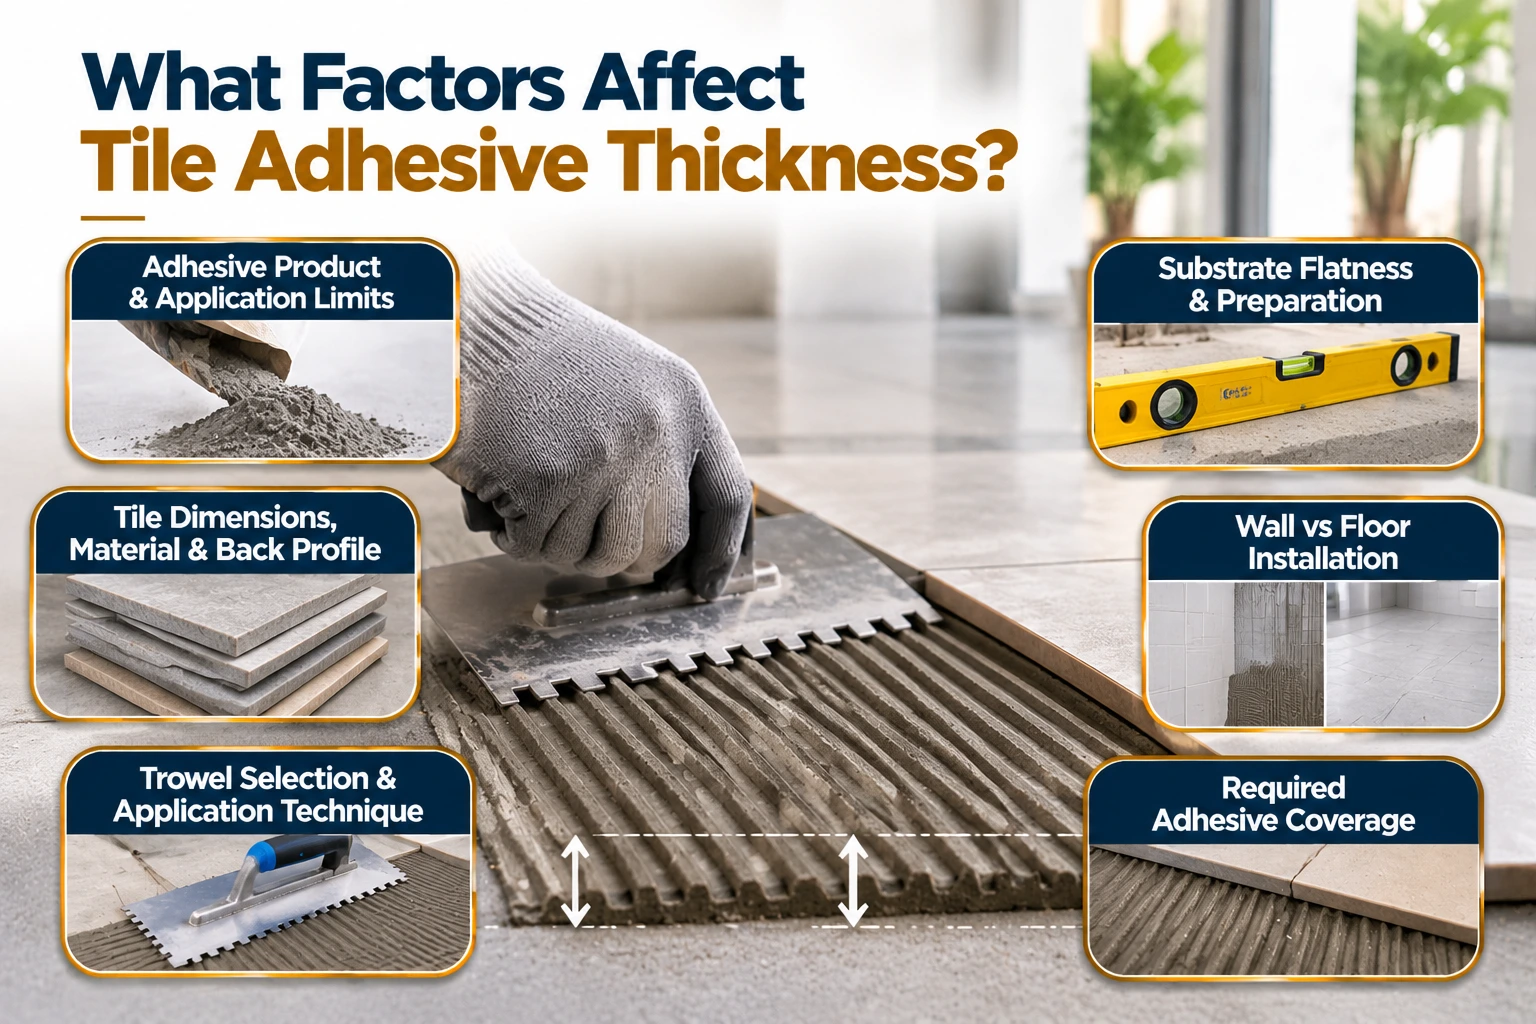
Several variables work together to determine the appropriate application depth. Changing one variable does not automatically resolve a problem caused by another.
The product formulation is one of the most important considerations. Different adhesives have different workability, bonding characteristics and permitted application depths.
A product designed for thin-bed installation should not be assumed to perform correctly when applied beyond its specified limits. Likewise, an adhesive intended for a particular demanding application must still be used within the manufacturer's stated requirements.
Read the technical data sheet before starting work. If the required bed cannot be achieved within the permitted range, investigate substrate preparation or select a more appropriate installation system.
An uneven substrate can produce inconsistent adhesive beds. High spots may leave insufficient room for adhesive, while low areas can create excessive gaps beneath the tile.
Preparing the surface before tiling helps achieve a more consistent result. Depending on the substrate, this may involve removing loose material, correcting defects or using a compatible levelling or preparation product.
Increasing adhesive thickness is not automatically an appropriate way to correct significant surface irregularities.
Tile dimensions can influence application technique because larger tiles require careful attention to contact across their full surface. Tile material, weight, thickness and the shape of the back also influence the installation requirements.
Some tile backs have grooves or textures that affect how adhesive transfers. The installer must use a compatible application method to obtain the required support.
Large-format tiles may require additional care, but they do not automatically justify unlimited adhesive thickness. For more specific guidance, consult Lapifix's large-format tile adhesive guide.
Wall installations must account for gravity and the possibility of tile slippage before the adhesive sets. Floor installations must provide suitable support for the expected loads and service conditions.
Neither application automatically requires a particular thickness. Product compatibility, tile characteristics, substrate quality and the installation method determine the appropriate solution.
The notched trowel controls how adhesive is distributed, but its notch dimension does not directly specify the finished bed thickness.
Trowel angle, notch shape, pressure, combing direction and tile movement all influence the final result. A suitable trowel should produce the required coverage without creating an unnecessarily thick or difficult-to-control layer.
For a detailed discussion of choosing a trowel, see the Lapifix Tile Adhesive Trowel Size Guide.
The adhesive bed must provide suitable contact between the tile and substrate. A layer that looks thick enough at the edge may still contain voids beneath the tile if the ridges have not collapsed adequately.
Coverage requirements depend on the installation conditions and applicable guidance. Check the manufacturer's instructions and inspect adhesive transfer during installation rather than relying on thickness alone.
Wall and floor installations share the same basic requirement: the adhesive must bond the tile securely to a suitable substrate. However, their practical demands differ.
On walls, tile weight, vertical positioning and the risk of slippage are important. The adhesive must be appropriate for the tile and wall application, and the installer must follow the recommended bedding and support method.
On floors, the adhesive must provide appropriate contact and support for the intended service conditions. Poorly supported areas can become vulnerable to damage under loading, depending on the tile and installation.
|
Consideration |
Wall tiles |
Floor tiles |
|
Main practical concern |
Secure positioning and resistance to slippage |
Consistent support and suitable load distribution |
|
Tile characteristics |
Weight, size and back profile |
Dimensions, thickness, back profile and expected loads |
|
Substrate preparation |
Sound, compatible and sufficiently even wall |
Sound, compatible and sufficiently even floor |
|
Adhesive selection |
Product approved for the tile and vertical use |
Product approved for the tile and floor application |
|
Application checks |
Tile stability and adhesive transfer |
Coverage, support and finished surface levels |
|
Thickness control |
Follow permitted application limits |
Follow permitted application limits |
The table provides general considerations, not universal installation specifications. The appropriate tile adhesive thickness must be established using the specific product instructions and project conditions.
Tile size affects the way adhesive is applied and the care needed to achieve consistent support. A larger tile can bridge variations in an uneven substrate, potentially leaving unsupported areas beneath it.
For this reason, larger tiles often require particularly careful substrate preparation, appropriate trowel selection and checks of adhesive transfer. Depending on the product and installation method, applying adhesive to the back of the tile may also be recommended.
However, a larger tile does not automatically require a thicker adhesive bed. The aim is to achieve the required contact within the permitted application range.
For oversized porcelain tiles or slabs, follow the tile manufacturer's installation instructions and the selected adhesive's technical documentation. If the substrate is outside the permitted flatness requirements, correct it before tiling rather than relying on extra adhesive.
Ordinary tile adhesive should not automatically be used as a levelling compound. Although some products permit limited variation or adjustment within their stated application range, that does not mean they can correct every dip, ridge or uneven area.
Applying excessive adhesive to compensate for an unsuitable substrate can create inconsistent bed thickness, make tile positioning difficult and increase the risk of inadequate contact or other installation defects.
Inspect the substrate before beginning work. Confirm that it is stable, clean, sufficiently flat and suitable for the chosen adhesive. Where correction is needed, use an appropriate preparation or levelling material that is compatible with the installation system.
Allow preparation products to reach the condition required by their manufacturers before tiling.
Good substrate preparation makes it easier to control tile adhesive thickness and achieve a consistent finished surface. It also helps reduce unnecessary adhesive consumption.
An adhesive layer outside the product's permitted range can create problems, although the outcome depends on the adhesive formulation, tile, substrate and installation conditions.
An excessively thick bed may make it difficult to maintain consistent tile levels or prevent slippage on vertical surfaces. Depending on the product, excessive thickness may also affect setting, drying or dimensional stability.
An insufficient bed can leave gaps beneath the tile, reduce adhesive contact or prevent the tile from receiving adequate support. These conditions may contribute to hollow areas, cracking or debonding in service.
|
Application issue |
Possible consequence |
Recommended response |
|
Adhesive exceeds the permitted thickness |
Uneven setting, movement or other product-related defects |
Follow the product limits and correct substrate irregularities |
|
Adhesive layer is insufficient |
Inadequate contact or support |
Review application technique and trowel selection |
|
Adhesive ridges remain partly uncollapsed |
Voids beneath the tile |
Check bedding technique and adhesive transfer |
|
Substrate is uneven |
Inconsistent bed and finished tile levels |
Prepare the substrate before tiling |
|
Adhesive has exceeded its open time |
Reduced contact or bonding |
Remove unsuitable exposed adhesive as directed and apply fresh material |
These are possible risks, not guaranteed outcomes. If an installation appears defective, assess the underlying cause rather than assuming thickness alone is responsible.
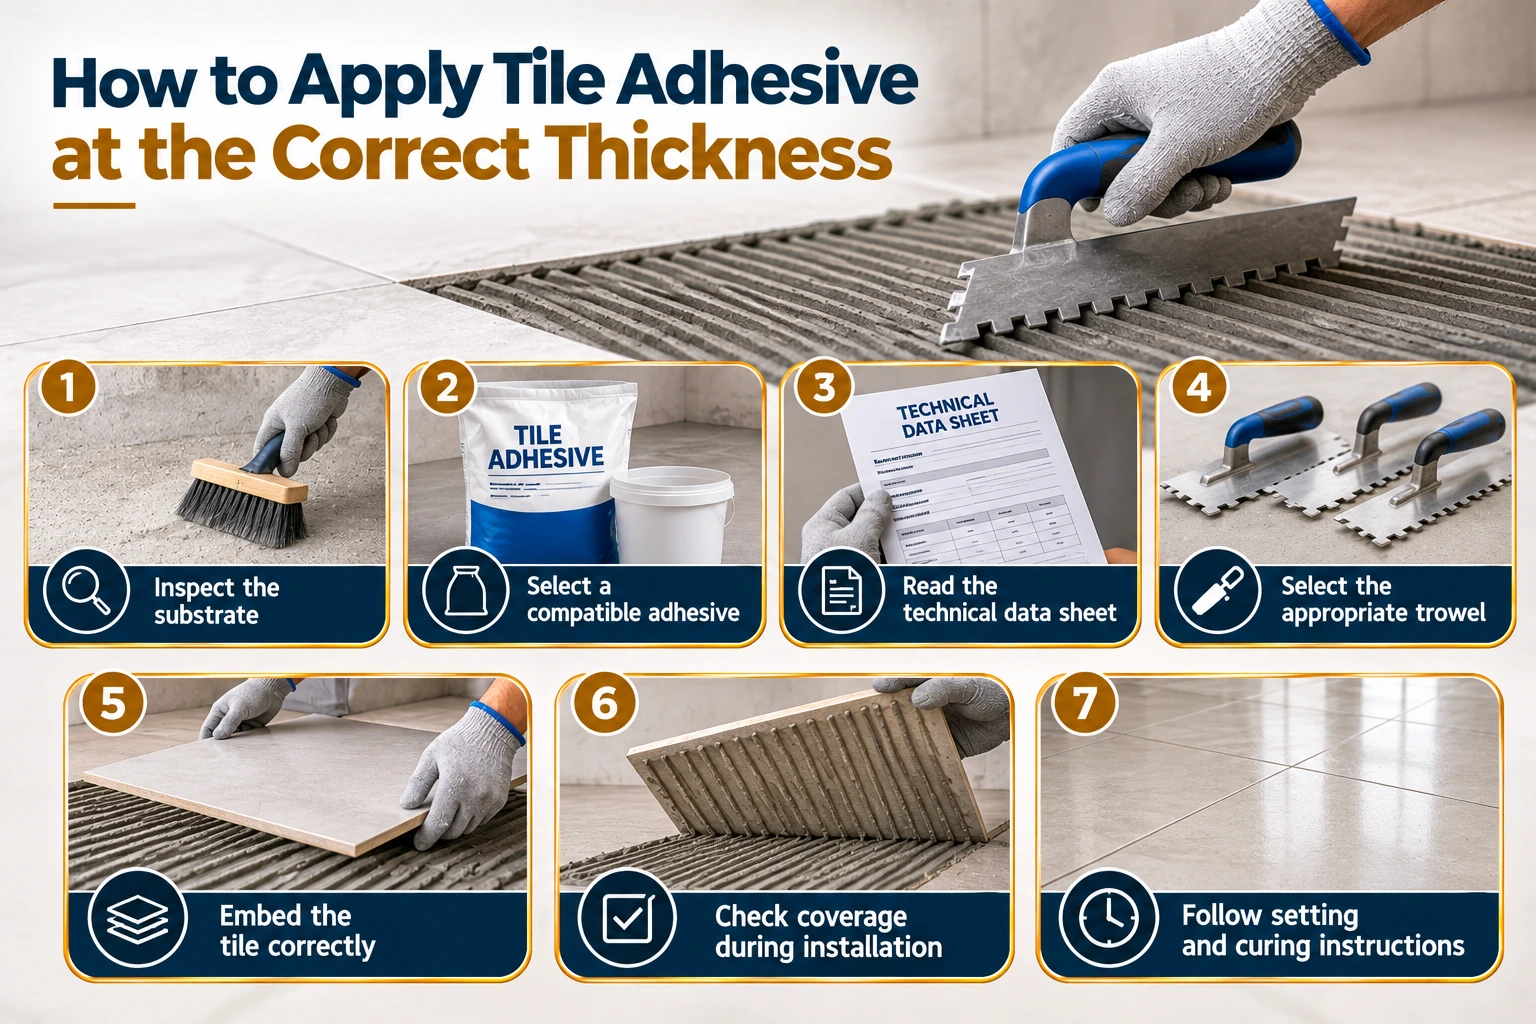
A controlled installation process helps achieve the intended adhesive bed without exceeding the product's limits.
Check the surface for unevenness, dust, loose material, contamination and other defects. Confirm that the substrate is suitable for the tile and installation environment.
Complete necessary preparation before applying adhesive.
Choose a product approved for the tile material, substrate, installation orientation and expected conditions. Confirm any restrictions relating to tile dimensions or application depth.
Check the permitted application range and the manufacturer's instructions for preparation, mixing, application and working time. Do not rely on a thickness recommendation from an unrelated product.
Choose a trowel suitable for the tile, substrate and adhesive system. Use the recommended technique to distribute adhesive consistently across the installation area.
Place the tile within the adhesive's specified working time. Press and move it according to the recommended installation method so that the ridges collapse and suitable contact is achieved.
Avoid excessive adjustment that could disturb the adhesive or allow the tile to move outside the intended position.
Where appropriate, lift a freshly placed tile to inspect adhesive transfer. If coverage is inadequate, review the trowel, technique, substrate condition and adhesive suitability before continuing.
Do not assume that adding more adhesive is the only solution.
Protect the completed installation from disturbance and follow the product's instructions for grouting, curing and return to service. The required timing depends on the product and site conditions.
Adhesive coverage should be verified during installation, particularly when working with larger tiles or demanding applications. The outside edge of a tile cannot prove that the adhesive has made adequate contact beneath the entire surface.
A practical check involves lifting a freshly placed tile, where appropriate, and examining how the adhesive has transferred to the tile back. Look for uncollapsed ridges, substantial gaps or areas where the adhesive has not contacted the surface as intended.
If the result is unsatisfactory, stop and identify the cause. The solution may involve correcting the substrate, adjusting the trowel technique or choosing a more suitable application method.
Tile adhesive coverage and thickness are related, but they are not interchangeable measurements. A thicker layer does not necessarily provide better coverage, and a suitable ridge height does not guarantee adequate contact if the tile is not embedded correctly.
Avoid these common mistakes during tile installation:
Ignoring the adhesive manufacturer's permitted application range.
Using adhesive to compensate for significant substrate irregularities.
Selecting a trowel without considering tile characteristics and substrate condition.
Allowing adhesive to exceed its specified open time before embedding the tile.
Failing to inspect adhesive transfer and coverage during installation.
Assuming all tile adhesives are suitable for the same application depth.
Avoiding these errors begins with selecting the right product, preparing the substrate and following the complete installation system.
Successful tile installation depends on more than selecting a suitable adhesive. The substrate must be properly prepared, the tile must be compatible with the product, and the application method must produce the required contact and support.
Understanding tile adhesive thickness helps installers control the adhesive bed, but it should never be treated as a universal number independent of the product and installation conditions. Trowel-notch dimensions, adhesive ridge height and the final compressed bed are different measurements.
Follow the manufacturer's technical data sheet, correct substrate irregularities before tiling and inspect coverage during installation. These steps help prevent avoidable defects and support a more consistent finished surface.
Lapifix offers tile installation products for different project requirements. Explore the Lapifix tile adhesive range and review the relevant technical documentation before choosing an adhesive for your project.
There is no universal value. The correct tile adhesive thickness depends on the product's permitted application range, tile characteristics, substrate condition and installation method. Always check the adhesive technical data sheet and verify coverage during installation.
Yes. Applying adhesive beyond its specified limits can affect tile positioning, setting and installation quality. Use an approved product within its permitted range and correct significant substrate unevenness before tiling.
It can differ because wall and floor installations have different practical demands. However, orientation alone does not determine the required bed. Tile characteristics, substrate condition and product instructions must all be considered.
Do not assume that ordinary tile adhesive can be used to level an uneven floor. Some products permit limited adjustment, but significant irregularities should be corrected using a compatible preparation or levelling system.
Not automatically. Larger tiles require careful attention to substrate flatness, adhesive distribution and coverage. Follow the tile and adhesive manufacturers' recommendations instead of increasing the bed thickness without justification.
The notch controls the ridges formed during application. Their height is different from the compressed adhesive bed beneath an embedded tile. Trowel angle, notch shape, adhesive consistency and tile movement also influence the final layer.
Where appropriate, lift a freshly placed tile and inspect adhesive transfer. Check for substantial gaps or uncollapsed ridges and follow the coverage requirements specified for the installation. The visible surface alone cannot prove adequate contact beneath an installed tile.
Check the technical data sheet and installation instructions for the exact adhesive product. If the permitted application depth is unclear or the project falls outside the stated conditions, contact the manufacturer for technical guidance.